
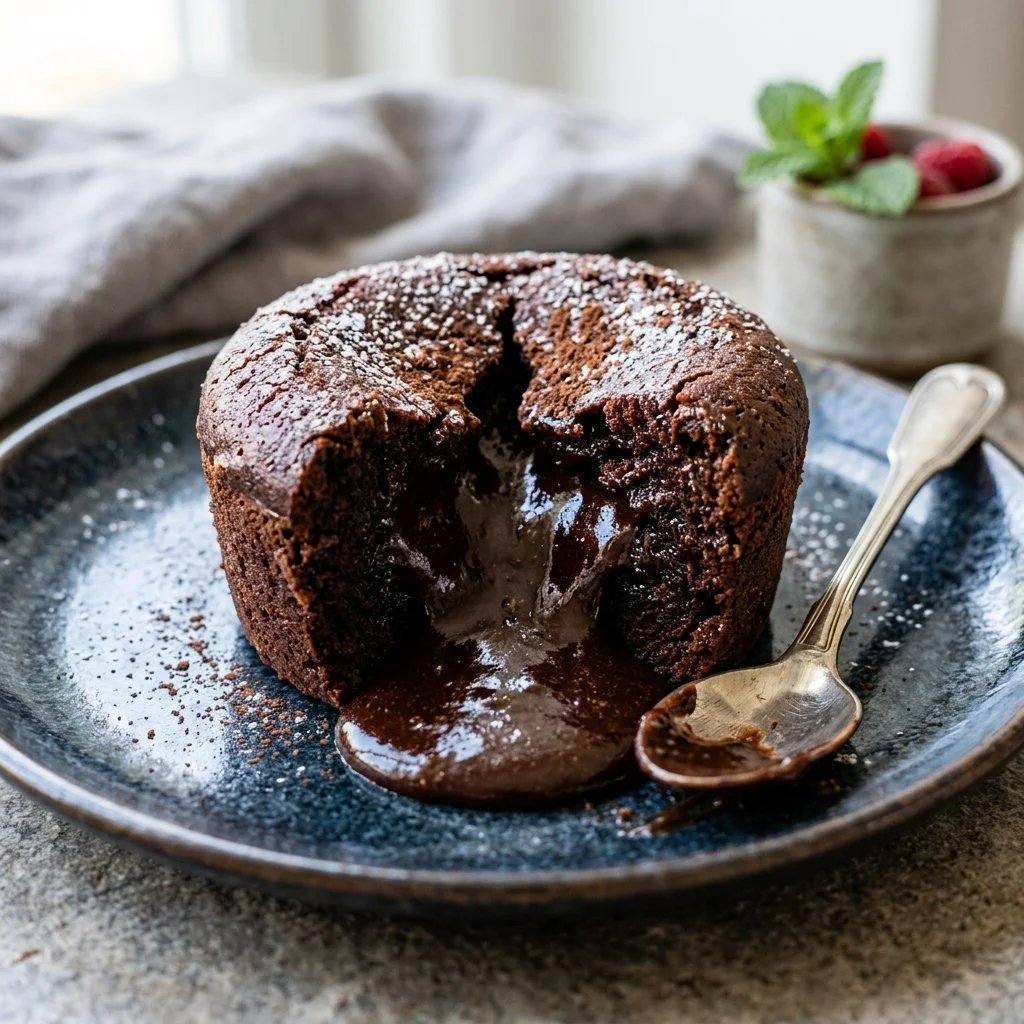
There’s something undeniably magical about the moment when a rich, gooey chocolate lava cake is cut open, and warm, velvety chocolate begins to flow from the center. This dessert has a special place in my heart, and it’s not just because of its indulgent taste or decadent texture. It reminds me of gathering around the dining table with friends and family after a long week, where laughter fills the air and the shared love of good food brings us even closer.
The first time I made lava cakes, I remember the excitement mixing with just a hint of anxiety as I waited for them to bake. Would they actually turn out perfectly? Would they ooze that molten chocolate that everyone dreams of? The answer, my friends, is yes! And now, I want to share this experience with you, so you can create the same delightful dessert that will surely leave a lasting impression on your loved ones.
Recipe Timing
- Prep Duration: 10 minutes
- Active Cooking: 14 minutes
- Total Duration: 24 minutes
- Portion Size: Serves 4
- Complexity: Simple
Nutritional Recipe
- Calories per portion: Approximately 360
- Protein: 6 grams
- Carbs: 32 grams
- Fats: 23 grams
- Fiber: 1 gram
- Sugars: 18 grams
- Sodium: 180 mg
Why You’ll Love This Chocolate Lava Cake
Chocolate lava cake is the perfect blend of simplicity and luxury. With just a handful of staple ingredients, you can create a show-stopping dessert that looks and tastes like it belongs at a high-end restaurant. The thrill of slicing into the cake and unveiling the molten center is a moment you’ll want to capture forever. Plus, the aroma of warm chocolate enveloping your kitchen is an invitation no sweet tooth can resist. It’s not just a dessert; it’s a sweet experience that creates memories.
The Complete Cooking Journey
Imagine the aroma of melted chocolate wafting through your kitchen long before guests arrive. As the cakes bake, anticipation builds, and soon you’ll be rewarded with luscious chocolate flowing from each bite. This recipe is not just about the final product; it’s also about enjoying every step of the process, feeling the excitement as your kitchen transforms into a paradise of cocoa goodness.
Ingredients:
- 1/2 cup (1 stick) unsalted butter
- 1 cup semi-sweet chocolate chips
- 2 large eggs
- 2 large egg yolks
- 1/4 cup granulated sugar
- 2 tablespoons all-purpose flour
- 1/4 teaspoon salt
- 1 teaspoon vanilla extract
Method:
Step 1: Preheat the Oven
Preheat the oven to 425°F (220°C). Grease four ramekins and place them on a baking sheet. This will ensure your cakes pop out smoothly once they are done baking.
Step 2: Melt the Chocolate & Butter
Melt the butter and chocolate chips together in a microwave-safe bowl or in a double boiler, stirring until smooth. The glossy, rich mixture is where the magic begins!
Step 3: Whisk Eggs & Sugar
In a separate bowl, whisk together the eggs, egg yolks, and sugar until thick and pale. This will add air to your batter, creating a lighter structure that supports your gooey center.
Step 4: Combine Mixtures
Stir in the melted chocolate mixture, followed by the flour, salt, and vanilla extract until just combined. Avoid overmixing; we want to keep that rich chocolate flavor as the star!
Step 5: Fill the Ramekins
Divide the batter evenly among the prepared ramekins, making sure not to overfill. They need space to bake and expand.
Step 6: Bake the Cakes
Bake for 12-14 minutes until the edges are firm but the center is soft. You’ll know your cakes are ready when the tops look set but still slightly jiggle in the middle.
Step 7: Cool & Serve
Let cool for 1 minute, then invert onto plates and serve immediately, ideally with a scoop of vanilla ice cream. The contrast of cold ice cream against warm cake is pure bliss!
Serving Suggestions & Pairings
These chocolate lava cakes shine on their own but pair wonderfully with vanilla ice cream, whipped cream, or fresh berries. A dusting of powdered sugar or a drizzle of raspberry sauce can elevate them even further. For that extra opulence, consider serving with a glass of dessert wine or a rich espresso.
Storage & Leftovers Guide
If you happen to have any leftovers (highly unlikely!), store them in an airtight container in the fridge for up to 2 days. Reheat gently in the microwave for about 15-20 seconds, just until warm.
Kitchen Wisdom & Success Tips
- Use high-quality chocolate for the best flavor.
- Don’t overbake! The beauty of lava cake lies in its gooey center.
- Experiment with baking times; all ovens vary, and you might just find your perfect sweet spot.
Flavor Variations & Adaptations
- For a fruity twist, add a tablespoon of orange zest to the batter, creating a delightful citrus contrast.
- Substitute the semi-sweet chocolate with dark chocolate for a richer flavor.
- You can even experiment by placing a piece of caramel or a raspberry in the center before baking for an exciting surprise!
Reader Questions & Solutions
-
Q: Can I make this in advance?
A: You can prepare the batter ahead and refrigerate in the ramekins, baking it right before serving. Just add a minute to the baking time. -
Q: My cakes deflated after baking. What happened?
A: Overmixing the batter or baking too long can cause this. Ensure you mix just until combined and keep an eye on the time! -
Q: How do I know it’s baked enough?
A: The edges should be set, and the center should still jiggle slightly. -
Q: Can I use different sizes of ramekins?
A: Yes, just adjust the baking time according to the size of your ramekins; smaller ones will bake faster! -
Q: Is there a gluten-free option?
A: Absolutely! Simply replace the all-purpose flour with a gluten-free blend or almond flour.
Wrapping Up
Indulging in a homemade chocolate lava cake is an experience worth sharing. With just a few simple ingredients and steps, you can bring a taste of gourmet sweetness into your own home. So, gather those loved ones, put on an apron, and let the adventure begin! Trust me, once you take that first bite, you’ll know exactly why this dessert has captivated hearts for generations. Happy baking!
PrintChocolate Lava Cake
Indulge in a rich and gooey chocolate lava cake that oozes warm chocolate from the center, creating a delightful dessert experience.
- Prep Time: 10 minutes
- Cook Time: 14 minutes
- Total Time: 24 minutes
- Yield: 4 servings 1x
- Category: Dessert
- Method: Baking
- Cuisine: American
- Diet: Vegetarian
Ingredients
- 1/2 cup (1 stick) unsalted butter
- 1 cup semi-sweet chocolate chips
- 2 large eggs
- 2 large egg yolks
- 1/4 cup granulated sugar
- 2 tablespoons all-purpose flour
- 1/4 teaspoon salt
- 1 teaspoon vanilla extract
Instructions
- Preheat the oven to 425°F (220°C). Grease four ramekins and place them on a baking sheet.
- Melt the butter and chocolate chips together in a microwave-safe bowl or in a double boiler, stirring until smooth.
- Whisk together the eggs, egg yolks, and sugar in a separate bowl until thick and pale.
- Combine the melted chocolate mixture with the egg mixture, followed by the flour, salt, and vanilla extract until just combined.
- Fill the ramekins evenly with batter, making sure not to overfill.
- Bake for 12-14 minutes until the edges are firm but the center is soft.
- Cool for 1 minute, then invert onto plates and serve immediately.
Notes
Pair with vanilla ice cream for a delicious contrast. For leftovers, store in an airtight container in the fridge for up to 2 days.
Nutrition
- Serving Size: 1 serving
- Calories: 360
- Sugar: 18g
- Sodium: 180mg
- Fat: 23g
- Saturated Fat: 14g
- Unsaturated Fat: 9g
- Trans Fat: 0g
- Carbohydrates: 32g
- Fiber: 1g
- Protein: 6g
- Cholesterol: 180mg


