There’s something undeniably captivating about the combination of peanut butter and chocolate. For many, it evokes childhood memories of sticky fingers and sweet delight, often reminding us of those school lunch treats sneaked away from mom’s pantry. Today, I want to take you on a journey that encapsulates the essence of nostalgia in a delightful treat: Butterfinger Balls. These indulgent little bites pack a punch of flavor and charm, perfect for any occasion—whether you’re hosting a gathering or simply treating yourself on a cozy afternoon.
Recipe Timing
- Prep Duration: 15 minutes
- Active Cooking: 20 minutes
- Total Duration: 1 hour (mostly refrigeration time)
- Portion Size: About 24 balls
- Complexity: Simple
Nutritional Recipe
- Calories per portion: Approx. 150
- Protein: 4 grams per serving
- Carbs: 16 grams per serving
- Fats: 9 grams per serving
- Fiber: 1 gram per serving
- Sugars: 8 grams per serving
- Sodium: 100 mg per serving
Why You’ll Love This Butterfinger Balls
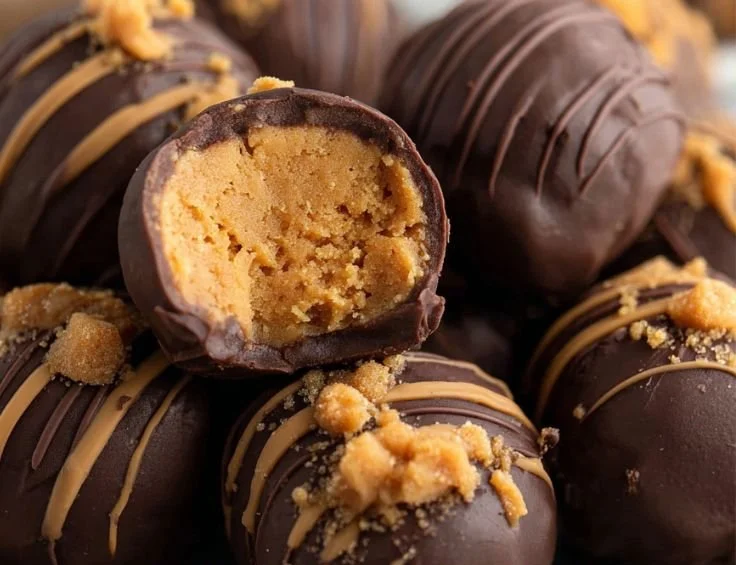
Each bite of these Butterfinger Balls carries the satisfying crunch of crushed Butterfinger candy mixed harmoniously with creamy peanut butter and smooth cream cheese. Then, they’re enveloped in a rich chocolate coating that adds a touch of elegance and decadence. Not only are they easy to make, but they also look beautiful on a platter, making them the star of any dessert table. Trust me, once you try these, you’ll want to share them with everyone!
The Complete Cooking Journey
Get ready for a fun culinary adventure! We’ll start by blending our main ingredients, then form them into delightful little balls that we will coat in a luscious chocolate bath. The entire process is straightforward, ensuring that even novice cooks can succeed.
Ingredients:
- 1 cup peanut butter
- 1 cup crushed Butterfinger candy
- 4 oz cream cheese, softened
- 2 cups chocolate chips
- 1 tablespoon butter
Method:
Step 1: Combining the Stars
In a mixing bowl, combine peanut butter, crushed Butterfinger candy, and softened cream cheese until the mixture is well blended. You want everything to be incorporated nicely so every bite has that signature flavor.
Step 2: Rolling into Delight
Scoop up the mixture and roll it into small balls, about 1 inch in diameter. This step is fun—get creative and make them just the right size for popping into your mouth!
Step 3: Chilling Out
Place the balls on a baking sheet lined with parchment paper and refrigerate for about 30 minutes. This is essential as it helps them firm up so they can hold their shape when you dip them in chocolate.
Step 4: Melting Chocolate Bliss
Melt the chocolate chips together with the butter. You can do this in a microwave-safe bowl, heating in 30-second intervals and stirring in between, or use a double boiler on the stovetop for more controlled melting.
Step 5: Dipping Delicately
Take each chilled ball and dip it into the melted chocolate, coating it evenly. This is where the magic happens! Return each coated ball to the parchment-lined sheet.
Step 6: Final Chill
Refrigerate the dipped balls again until the chocolate is set, which should take about 15-20 minutes. The patience will be worth it!
Step 7: Serving the Sweetness
Once the chocolate has set, it’s time to serve and enjoy! Indulge in these heavenly treats and savor every last bite.
Serving Suggestions & Pairings
These Butterfinger Balls are delightful on their own but can also be paired with a side of ice cream or a drizzle of caramel sauce for an extra special treat. For a themed gathering, pair them with other dessert bites such as brownie bites or mini cheesecakes for variety.
Storage & Leftovers Guide
Store any leftovers in an airtight container in the refrigerator for up to one week. Trust me, they won’t last long, but just in case, this ensures they stay fresh and delicious for as long as possible. You can also freeze them for up to three months!
Kitchen Wisdom & Success Tips
- For perfectly uniform balls, consider using a cookie scoop.
- If your chocolate is too thick, add a touch more butter to reach the desired consistency.
- Feel free to get creative with the coating—try rolling them in crushed nuts or sprinkles for a festive touch.
Flavor Variations & Adaptations
Want to switch things up? Use almond butter instead of peanut butter for a nutty twist. You can also experiment with different types of chocolate—dark, milk, or even white chocolate for a sweet twist on this classic recipe.
Reader Questions & Solutions
-
Can I use crunchy peanut butter?
- Absolutely! Crunchy peanut butter will add extra texture and is perfect for those who love that added crunch.
-
How do I make these gluten-free?
- All the ingredients used in this recipe are naturally gluten-free. Just ensure your chocolate chips and Butterfinger candy are certified gluten-free.
-
What if the chocolate hardens before I dip all the balls?
- Simply reheat the chocolate carefully. You can add a small amount of butter to keep it smooth.
-
Can I use another candy instead of Butterfinger?
- Yes! Any crushed candy bar of your choice will work well, like Snickers or Milky Way.
-
What’s the best way to melt the chocolate?
- Using a double boiler is the safest way to melt chocolate without burning it, but the microwave works well too if done cautiously.
Wrapping Up
These Butterfinger Balls are more than just a treat; they’re a little celebration wrapped in chocolate and nostalgia! Whether you’re making them for a party or just for yourself, they promise to bring joy to every occasion. So grab your ingredients, follow along with the steps, and enjoy the delightful experience of making these sweet bites. Happy cooking!
PrintButterfinger Balls

Delightful treats combining peanut butter, crushed Butterfinger candy, and a rich chocolate coating.
- Prep Time: 15 minutes
- Cook Time: 20 minutes
- Total Time: 60 minutes
- Yield: 24 servings 1x
- Category: Dessert
- Method: Chilling, Melting, Rolling
- Cuisine: American
- Diet: Vegetarian
Ingredients
- 1 cup peanut butter
- 1 cup crushed Butterfinger candy
- 4 oz cream cheese, softened
- 2 cups chocolate chips
- 1 tablespoon butter
Instructions
- In a mixing bowl, combine peanut butter, crushed Butterfinger candy, and softened cream cheese until well blended.
- Scoop the mixture and roll it into small balls, about 1 inch in diameter.
- Place the balls on a baking sheet lined with parchment paper and refrigerate for about 30 minutes.
- Melt chocolate chips together with butter in a microwave-safe bowl or double boiler.
- Dip each chilled ball into the melted chocolate, coating evenly and return to the parchment-lined sheet.
- Refrigerate again until chocolate is set, about 15-20 minutes.
- Serve and enjoy these heavenly treats!
Notes
These are delightful on their own or can be paired with ice cream or caramel sauce. Store leftovers in an airtight container in the refrigerator for up to one week.
Nutrition
- Serving Size: 1 ball
- Calories: 150
- Sugar: 8g
- Sodium: 100mg
- Fat: 9g
- Saturated Fat: 3g
- Unsaturated Fat: 6g
- Trans Fat: 0g
- Carbohydrates: 16g
- Fiber: 1g
- Protein: 4g
- Cholesterol: 10mg