
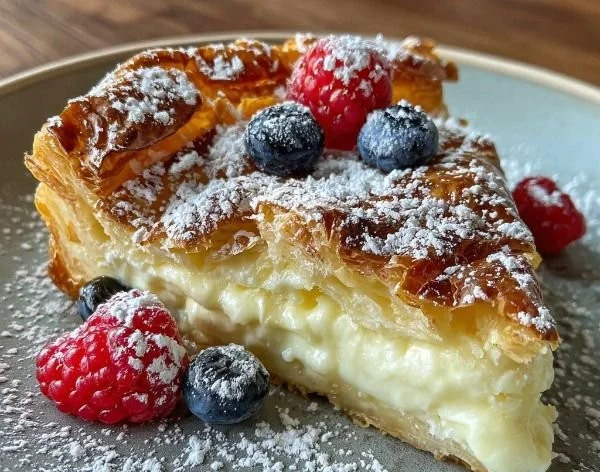
There’s something undeniably comforting about a warm, sweet pastry filled with creamy cheesecake goodness. I remember the first time I took a bite of a cheesecake Danish: my mouth was immediately filled with clouds of soft, sweet cream cheese enveloped in a buttery, flaky crust that practically melted in my mouth. It was a delightful combination that had me daydreaming about recreating that moment in my own kitchen. So today, I’m thrilled to share my recipe for a Decadent Creamy Cheesecake Danish with a Buttery Flaky Crust that will have you swooning at first bite!
## Recipe Timing
- Prep Duration: 1 hour 20 minutes (includes chilling)
- Active Cooking: 45 minutes
- Total Duration: 2 hours 5 minutes
- Portion Size: 8-10 servings
- Complexity: Moderate
## Nutritional Recipe
- Calories per portion: Approximately 300
- Protein: 4 g
- Carbs: 26 g
- Fats: 20 g
- Fiber: 0 g
- Sugars: 10 g
- Sodium: 200 mg
## Why You’ll Love This Decadent Creamy Cheesecake Danish with a Buttery Flaky Crust
This cheesecake Danish is not just another dessert; it’s an experience. The rich, creamy filling is perfectly balanced with a hint of tang from the sour cream and lemon zest, while the flaky crust provides that satisfying crunch that contrasts beautifully with the softness of the cheesecake. It’s like having a slice of happiness, beautifully drizzled with a sugary glaze and topped with fresh berries, perfect for any occasion—be it breakfast, brunch, or dessert.
## The Complete Cooking Journey
Each step of making this cheesecake Danish is filled with joy and creativity—from making the perfect flaky crust to preparing a luscious cheesecake filling that is truly unforgettable. So, put on your apron, and let’s get started on this delightful baking adventure!
## Ingredients:
For the flaky crust:
- 1 ½ cups all-purpose flour
- ½ teaspoon salt
- 1 tablespoon sugar
- 1 cup unsalted butter, cold and cut into cubes
- 4-5 tablespoons ice water
For the cheesecake filling:
- 16 ounces cream cheese, softened
- ¾ cup granulated sugar
- 2 large eggs
- 1 teaspoon vanilla extract
- 2 tablespoons sour cream
- Zest of 1 lemon (optional)
For the topping:
- ½ cup powdered sugar
- 1 tablespoon milk (more if needed to adjust consistency)
- Fresh berries for garnish (optional)
## Method:
### Step 1: Make the Flaky Crust
Start by making the flaky crust. In a large mixing bowl, combine the flour, salt, and sugar. Stir until evenly mixed.
### Step 2: Combine the Butter
Add the cold, cubed butter into the flour mixture. Use a pastry cutter or your fingertips to blend the butter into the flour until the mixture resembles coarse crumbs.
### Step 3: Form the Dough
Gradually add the ice water, one tablespoon at a time, mixing gently until the dough comes together. Be careful not to overmix.
### Step 4: Chill the Dough
Shape the dough into a disc, wrap it in plastic wrap, and refrigerate for at least 1 hour.
### Step 5: Preheat and Prepare
Preheat your oven to 375°F (190°C) and prepare a 9-inch tart pan or baking dish.
### Step 6: Roll Out the Dough
On a lightly floured surface, roll out the chilled dough into a large circle that fits your tart pan. Carefully transfer the dough to the pan, pressing it gently into the edges. Trim off any excess dough. Prick the bottom of the crust with a fork to prevent bubbling.
### Step 7: Pre-bake the Crust
Place parchment paper over the crust and fill it with pie weights or dried beans. Bake for 15 minutes or until the edges are lightly golden.
### Step 8: Prepare the Cheesecake Filling
While the crust is baking, prepare the cheesecake filling. In a large mixing bowl, beat the softened cream cheese with a hand mixer until smooth and creamy.
### Step 9: Add Sugar and Eggs
Gradually add the granulated sugar, continuing to mix until well combined. Add the eggs, one at a time, mixing well after each addition.
### Step 10: Mix in Flavor
Stir in the vanilla extract, sour cream, and lemon zest (if using) until fully incorporated and smooth.
### Step 11: Fill the Crust
Remove the crust from the oven and carefully take off the parchment paper and weights. Pour the cheesecake filling into the baked crust, smoothing it out with a spatula.
### Step 12: Bake the Danish
Bake the cheesecake Danish for 25-30 minutes, or until the filling is set but still slightly jiggly in the center. Remove from the oven and let it cool at room temperature for 15 minutes.
### Step 13: Prepare the Drizzle
While the cheesecake is cooling, prepare the drizzle by mixing the powdered sugar and milk in a small bowl until smooth. Adjust the consistency with more milk or sugar as needed.
### Step 14: Finalize and Chill
Once the cheesecake Danish has cooled completely, drizzle the icing over the top and garnish with fresh berries if desired. Chill in the fridge for at least 2 hours before serving for the best flavor and texture.
## Serving Suggestions & Pairings
Serve this decadent cheesecake Danish with a side of freshly brewed coffee or a cup of tea. It’s also a lovely accompaniment to a fruit salad or yogurt for a delightful brunch spread. For those special moments, pair it with champagne or a sweet dessert wine.
## Storage & Leftovers Guide
Leftovers can be stored in an airtight container in the refrigerator for up to 3 days. The flavors will continue to develop, making it even more delightful on the second day!
## Kitchen Wisdom & Success Tips
- Make sure your butter is really cold for the flakiest crust.
- If you don’t have a tart pan, a regular pie dish works just fine!
- For a flavor twist, try using flavored cream cheese or adding in chocolate chips to the filling.
## Flavor Variations & Adaptations
Feel free to experiment with flavors by adding crushed cookies to the crust, or try different fruit toppings like sliced strawberries, blueberries, or even a drizzle of chocolate. For a touch of spice, consider adding cinnamon or nutmeg into the filling.
## Reader Questions & Solutions
-
Q: My crust didn’t rise properly, what went wrong?
A: Make sure you pricked the crust and didn’t skip the pie weights step! This helps prevent bubbling. -
Q: Can I make this ahead of time?
A: Absolutely! This Danish can be made a day ahead; just store it in the refrigerator. -
Q: What can I substitute for cream cheese?
A: Mascarpone or ricotta can be used for a different texture and flavor! -
Q: How can I tell when the cheesecake is done?
A: The edges should be set, and the center will be slightly jiggly but not liquid. -
Q: Can I freeze the Danish?
A: Yes! You can freeze it before or after baking. Just be sure to wrap it tightly!
## Wrapping Up
I hope you’re inspired to dive into this delightful journey of making a Decadent Creamy Cheesecake Danish with a Buttery Flaky Crust. Every inch of this pastry is packed with joy and flavor, making it a crowd-pleaser for any gathering. Whether you’re savoring it alone or sharing it with loved ones, each bite is sure to bring a smile. Happy baking, and enjoy every delicious moment!
PrintDecadent Creamy Cheesecake Danish with a Buttery Flaky Crust

A comforting cheesecake Danish filled with creamy cheesecake goodness and wrapped in a buttery, flaky crust.
- Prep Time: 80 minutes
- Cook Time: 45 minutes
- Total Time: 125 minutes
- Yield: 8-10 servings 1x
- Category: Dessert
- Method: Baking
- Cuisine: American
- Diet: Vegetarian
Ingredients
- 1 ½ cups all-purpose flour
- ½ teaspoon salt
- 1 tablespoon sugar
- 1 cup unsalted butter, cold and cut into cubes
- 4–5 tablespoons ice water
- 16 ounces cream cheese, softened
- ¾ cup granulated sugar
- 2 large eggs
- 1 teaspoon vanilla extract
- 2 tablespoons sour cream
- Zest of 1 lemon (optional)
- ½ cup powdered sugar
- 1 tablespoon milk (more if needed to adjust consistency)
- Fresh berries for garnish (optional)
Instructions
- Make the flaky crust. In a large mixing bowl, combine the flour, salt, and sugar. Stir until evenly mixed.
- Add the cold, cubed butter into the flour mixture. Use a pastry cutter or your fingertips to blend the butter until resembles coarse crumbs.
- Gradually add the ice water, one tablespoon at a time, mixing gently until the dough comes together. Be careful not to overmix.
- Shape the dough into a disc, wrap it in plastic wrap, and refrigerate for at least 1 hour.
- Preheat your oven to 375°F (190°C) and prepare a 9-inch tart pan or baking dish.
- Roll out the chilled dough into a large circle that fits your tart pan. Transfer the dough to the pan, pressing it gently into the edges. Trim off any excess dough. Prick the bottom of the crust with a fork to prevent bubbling.
- Place parchment paper over the crust and fill it with pie weights or dried beans. Bake for 15 minutes or until the edges are lightly golden.
- While the crust is baking, prepare the cheesecake filling. In a large mixing bowl, beat the softened cream cheese with a hand mixer until smooth and creamy.
- Gradually add the granulated sugar, continuing to mix until well combined. Add the eggs, one at a time, mixing well after each addition.
- Stir in the vanilla extract, sour cream, and lemon zest (if using) until fully incorporated and smooth.
- Remove the crust from the oven and take off the parchment paper and weights. Pour the cheesecake filling into the baked crust, smoothing it out with a spatula.
- Bake the cheesecake Danish for 25-30 minutes, or until the filling is set but still slightly jiggly in the center. Remove from the oven and let cool at room temperature for 15 minutes.
- While the cheesecake is cooling, prepare the drizzle by mixing the powdered sugar and milk in a small bowl until smooth. Adjust the consistency with more milk or sugar as needed.
- Once the cheesecake Danish has cooled completely, drizzle the icing over the top and garnish with fresh berries if desired. Chill in the fridge for at least 2 hours before serving for best flavor and texture.
Notes
Make sure your butter is really cold for the flakiest crust. Leftovers can be stored in an airtight container in the refrigerator for up to 3 days.
Nutrition
- Serving Size: 1 serving
- Calories: 300
- Sugar: 10g
- Sodium: 200mg
- Fat: 20g
- Saturated Fat: 12g
- Unsaturated Fat: 6g
- Trans Fat: 0g
- Carbohydrates: 26g
- Fiber: 0g
- Protein: 4g
- Cholesterol: 100mg


