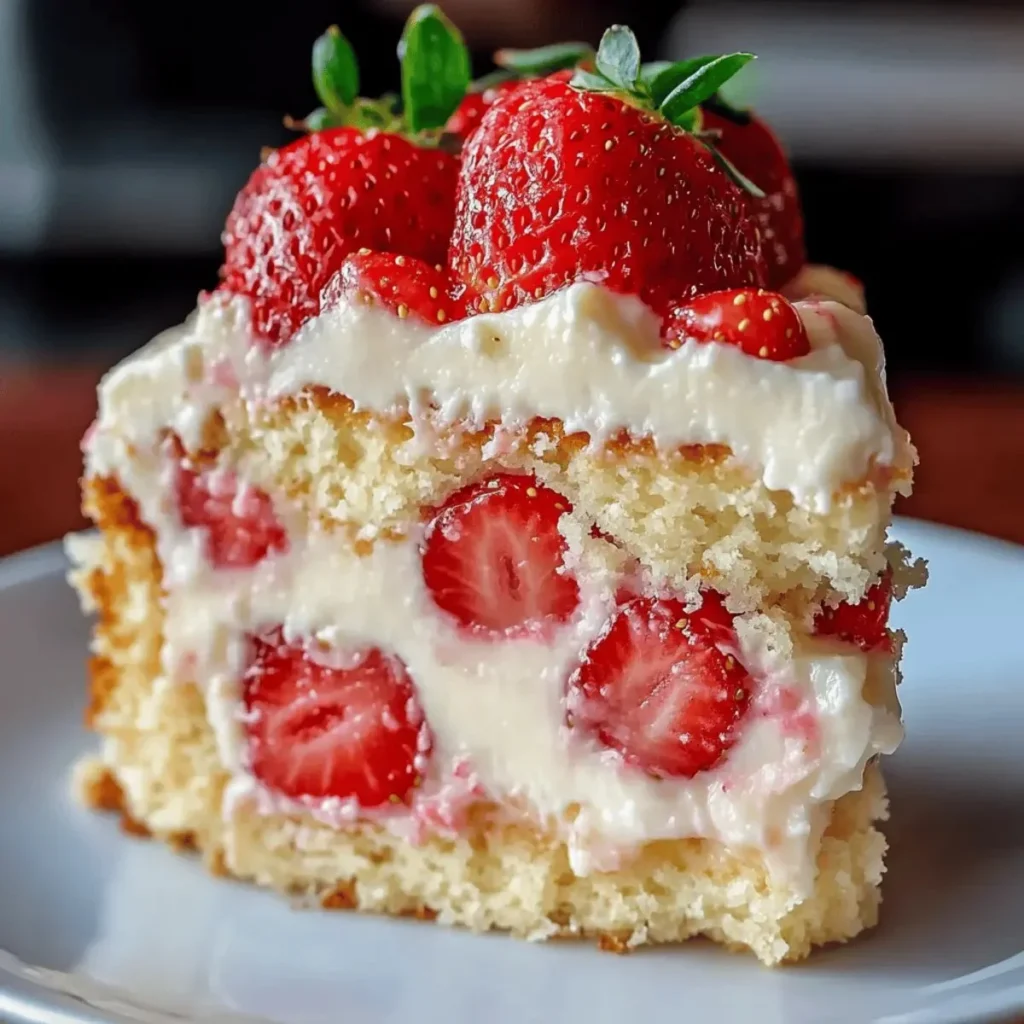
There’s something absolutely magical about a slice of cake topped with sweet, juicy strawberries. It reminds me of long summer afternoons spent with my grandmother in her cozy kitchen, where the air was filled with the scent of fresh berries and promise. One afternoon, she introduced me to her legendary Strawberry Custard Cake, a delightful dessert that has stuck with me throughout the years. The blend of creamy custard and the tender sweetness of strawberries makes each bite a celebration of flavor that whispers of sunny days and cherished memories.
Recipe Timing
- Prep Duration: 25 minutes
- Active Cooking: 30 minutes
- Total Duration: 2 hours 55 minutes (including chilling time)
- Portion Size: 8 servings
- Complexity: Simple
Nutritional Recipe
- Calories per portion: Approximately 320
- Protein: 5g
- Carbs: 34g
- Fats: 18g
- Fiber: 1g
- Sugars: 15g
- Sodium: 85mg
Why You’ll Love This Creamy Strawberry Custard Cake
This Creamy Strawberry Custard Cake isn’t just a dessert; it’s an experience. Imagine the rich sweetness of the custard perfectly balanced with the tang of fresh strawberries, all resting on a fluffy cake base. Each forkful brings together contrasting textures: the creaminess of the custard complements the light sponge, while the luscious strawberries add a pop of freshness. It’s a dessert that’s perfect for family gatherings or a cozy night in, and it’s simple enough that you might just find yourself making it every weekend!
The Complete Cooking Journey
Let’s embark on a delightful cooking journey together—one that brings us from the comfort of our kitchens to the joyous table. Along the way, we’ll pour our hearts into creating a dessert destined to impress. With just a handful of ingredients, we’ll mix, bake, and chill our way to a stunning Strawberry Custard Cake that tastes as good as it looks.
Ingredients:
- 2 cups fresh strawberries, sliced
- 1 cup milk
- 1 cup heavy cream
- 1/2 cup sugar
- 3 large eggs
- 1/4 cup cornstarch
- 1 teaspoon vanilla extract
- 1/4 teaspoon salt
- 1 prepared cake base (sponge or vanilla cake)
- Optional: whipped cream for topping
Method:
Step 1: Preheat the Oven
Preheat the oven to 350°F (175°C). This step is essential to ensure your cake base gets a head start, baking to fluffy perfection while we prepare the custard.
Step 2: Heat the Dairy
In a saucepan, heat the milk and heavy cream over medium heat until just simmering. This step helps to create a rich custard by infusing the milk with the warmth necessary to bring out the flavors without boiling.
Step 3: Whisk the Ingredients
In a bowl, whisk together the sugar, eggs, cornstarch, vanilla extract, and salt. Slowly add the hot milk mixture to the egg mixture, stirring constantly. This tempering process is critical in preventing the eggs from scrambling, ensuring a smooth custard.
Step 4: Cook the Mixture
Return the mixture to the saucepan and cook over medium heat, stirring, until thickened. You’ll know it’s ready when it coats the back of a spoon. It’s like a warm hug in a pan!
Step 5: Cool Slightly
Remove from heat and let cool slightly. Patience is key here to allow the custard to settle before pouring it over the cake.
Step 6: Assemble in the Cake Pan
In a cake pan, place the prepared cake base. Pour the custard over the cake base and arrange the sliced strawberries on top. The beautiful colors already make this dessert a feast for the eyes!
Step 7: Chill in the Refrigerator
Let it set in the refrigerator for at least 2 hours. Chilling allows the flavors to meld and the custard to firm up. It’s hard to wait, but trust me, it’ll be worth it!
Step 8: Serve with Style
Serve chilled, optionally topped with whipped cream. The added touch of whipped cream takes it over the top, making it feel even more special!
Serving Suggestions & Pairings
This delightful cake pairs beautifully with a chilled glass of sparkling water or a refreshing iced tea. For an even more decadent experience, consider serving it alongside a scoop of vanilla ice cream or a dollop of freshly whipped cream that complements the tartness of the strawberries.
Storage & Leftovers Guide
If you happen to have any leftovers, store the cake covered in the refrigerator for up to 3 days. Just note that the strawberries may release some juices, which could make the cake a bit soggier over time but no less delicious!
Kitchen Wisdom & Success Tips
- Freshness Matters: Use the ripest strawberries for the best flavor.
- Tempering the Eggs: Make sure to whisk quickly while adding the hot milk to the eggs to avoid cooking the eggs prematurely.
- Test for Thickness: Remember, the custard should be thick enough to coat a spoon but not so thick that it becomes custard-like pudding.
Flavor Variations & Adaptations
- Berry Bliss: Substitute the strawberries with blueberries, raspberries, or even blackberries for a mixed berry custard cake variation.
- Zesty Twist: Add a hint of lemon or orange zest to the custard for a citrusy profile. It brightens up the flavors wonderfully!
Reader Questions & Solutions
- Can I use frozen strawberries? Yes! Just ensure they are fully thawed and drained before using to avoid excess water in the cake.
- What if my custard doesn’t thicken? Ensure you’re cooking over medium heat and stirring constantly. It may take a few more minutes; just be patient!
- Can I make this gluten-free? Absolutely! Opt for a gluten-free cake base, and you can enjoy this dessert without worry.
- Is there a dairy-free option? You can substitute the milk and heavy cream with almond milk and coconut cream for a dairy-free twist!
- How can I make it sweeter? Feel free to increase the sugar slightly in the custard if you prefer a sweeter cake. Just be mindful not to overdo it!
Wrapping Up
As we conclude our culinary journey to create this Creamy Strawberry Custard Cake, remember that food is not just about taste—it’s about creating memories and sharing love. Gather your ingredients and channel your inner chef. I promise you, one bite into this fluffy, sweet goodness, and you’ll be transported to a sunlit kitchen, surrounded by laughter and joy. Enjoy every moment of baking and indulging in this delightful dessert!
PrintCreamy Strawberry Custard Cake
A delightful dessert featuring creamy custard and fresh strawberries over a fluffy cake base, perfect for any gathering.
- Prep Time: 25 minutes
- Cook Time: 30 minutes
- Total Time: 175 minutes
- Yield: 8 servings 1x
- Category: Dessert
- Method: Baking
- Cuisine: American
- Diet: Vegetarian
Ingredients
- 2 cups fresh strawberries, sliced
- 1 cup milk
- 1 cup heavy cream
- 1/2 cup sugar
- 3 large eggs
- 1/4 cup cornstarch
- 1 teaspoon vanilla extract
- 1/4 teaspoon salt
- 1 prepared cake base (sponge or vanilla cake)
- Optional: whipped cream for topping
Instructions
- Preheat the oven to 350°F (175°C).
- Heat the milk and heavy cream over medium heat until just simmering.
- Whisk together the sugar, eggs, cornstarch, vanilla extract, and salt in a bowl.
- Slowly add the hot milk mixture, stirring constantly.
- Return the mixture to the saucepan and cook over medium heat, stirring until thickened.
- Remove from heat and let cool slightly.
- Place the prepared cake base in a cake pan and pour the custard over it, arranging the sliced strawberries on top.
- Chill in the refrigerator for at least 2 hours.
- Serve chilled, optionally topped with whipped cream.
Notes
Use the ripest strawberries for the best flavor. If you have leftovers, store the cake covered in the refrigerator for up to 3 days.
Nutrition
- Serving Size: 1 serving
- Calories: 320
- Sugar: 15g
- Sodium: 85mg
- Fat: 18g
- Saturated Fat: 11g
- Unsaturated Fat: 7g
- Trans Fat: 0g
- Carbohydrates: 34g
- Fiber: 1g
- Protein: 5g
- Cholesterol: 195mg