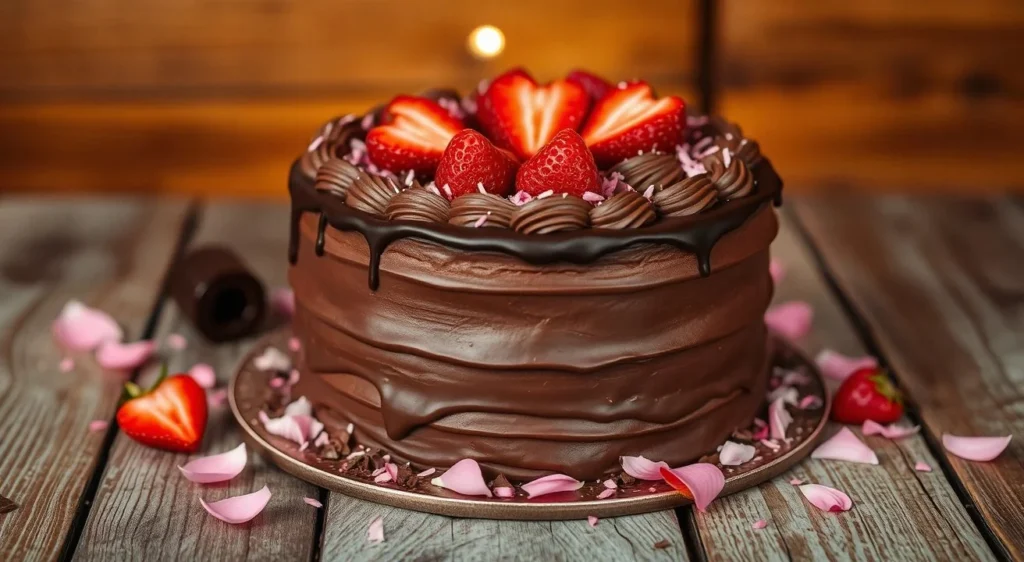
There’s something magical about creating and sharing a beautiful homemade cake, especially when it’s filled with rich chocolate goodness. I’ll never forget the first time I made the Decadent Chocolate Valentine’s Day Cake for my partner. It was a chilly February evening, and the kitchen was filled with the warm, inviting aromas of melted chocolate and freshly baked cake. As the cake rose in the oven, I felt a rush of anticipation—not just for the taste but for the shared celebration about to unfold. It became our little tradition; every year, we’d mark Valentine’s Day with this delectable treat and a cozy evening filled with laughter and love.
In this blog post, I’m excited to share how you can recreate that same delightful experience at home with this simple yet sensational recipe. Whether you’re celebrating a special occasion, or simply indulging in a classic dessert, this cake is sure to impress!
Recipe Timing
- Prep Duration: 20 minutes
- Active Cooking: 35 minutes
- Total Duration: 55 minutes
- Portion Size: Serves 12
- Complexity: Simple
Nutritional Recipe
- Calories per portion: Approximately 380
- Protein: 5g
- Carbs: 65g
- Fats: 12g
- Fiber: 2g
- Sugars: 42g
- Sodium: 350mg
Why You’ll Love This Decadent Chocolate Valentine’s Day Cake
This cake is a chocolate lover’s dream come true! Its moist, fluffy texture and rich flavor create a mouth-watering experience with every bite. The addition of boiling water in the batter ensures that the cake remains incredibly moist, while the chocolate frosting brings a luscious finish, making it perfect for a romantic dinner or any festive gathering. Plus, it’s easy to whip up, so even if you’re not a seasoned baker, you can confidently make a cake that will wow your loved ones.
The Complete Cooking Journey
With a handful of straightforward ingredients, this cake comes together quickly and easily. From mixing the batter to the heavenly moment of slicing into a double-layered chocolate delight, you’ll experience the joy of baking without the fuss. Get ready for your kitchen to be filled with aromas that will make your heart skip a beat!
Ingredients:
- 1 3/4 cups all-purpose flour
- 1 3/4 cups granulated sugar
- 3/4 cup unsweetened cocoa powder
- 1 1/2 teaspoons baking powder
- 1 1/2 teaspoons baking soda
- 1 teaspoon salt
- 2 large eggs
- 1 cup whole milk
- 1/2 cup vegetable oil
- 2 teaspoons vanilla extract
- 1 cup boiling water
- Chocolate frosting
- Chocolate shavings or sprinkles (for decoration)
Method:
-
Step 1: Preheat the Oven
Preheat your oven to 350°F (175°C). Grease and flour two 9-inch round cake pans to ensure your cake releases easily after baking.
-
Step 2: Combine Dry Ingredients
In a large mixing bowl, whisk together the flour, granulated sugar, cocoa powder, baking powder, baking soda, and salt until evenly mixed. This ensures that every slice is consistently delicious!
-
Step 3: Mix Wet Ingredients
Add the eggs, whole milk, vegetable oil, and vanilla extract to the dry ingredients. Mix until well combined, and you’ll start to see a rich batter form.
-
Step 4: Add Boiling Water
Carefully stir in the boiling water until the batter is smooth—this step is key for that perfectly moist cake texture. Don’t worry if the batter seems thin; that’s exactly what you want!
-
Step 5: Pour into Pans
Divide the batter evenly between the prepared cake pans. A kitchen scale can help with ensuring equal portions, but just eyeballing it works too!
-
Step 6: Bake to Perfection
Bake for 30-35 minutes, or until a toothpick inserted in the center comes out clean. This is the moment you’ll want to savor the delightful scent wafting through your kitchen.
-
Step 7: Cool Down
Let the cakes cool in the pans for 10 minutes before gently transferring them to wire racks to cool completely. This rest is important for getting your layers just right.
-
Step 8: Frosting Magic
Once the cakes are cool, spread chocolate frosting generously between the layers and on top. Get creative here—spread it thick if you like a bit of extra indulgence!
-
Step 9: Sprinkle & Serve
Decorate with chocolate shavings or sprinkles to bring an elegant touch to your cake. Slice and serve to your delighted guests!
Serving Suggestions & Pairings
This Decadent Chocolate Valentine’s Day Cake pairs wonderfully with a scoop of vanilla ice cream or a dollop of whipped cream. Serve it alongside fresh berries for a burst of tartness that complements the rich chocolate perfectly. For a drink pairing, consider a glass of bold red wine or a creamy cappuccino to balance the sweet, chocolaty flavors.
Storage & Leftovers Guide
If you happen to have leftovers (which is rare!), store slices in an airtight container at room temperature for up to 3 days. You can also refrigerate it for up to a week; just make sure it’s well covered to prevent drying out!
Kitchen Wisdom & Success Tips
- Room Temperature Ingredients: For the best results, ensure that your eggs and milk are at room temperature before mixing. This helps create a smoother batter.
- Don’t Overmix: Once you add the wet ingredients to the dry, mix just until combined to avoid a dense cake.
- Room for Decorations: When frosting, allow the cake to slightly set first, so the frosting goes on smoothly and does not slide off.
Flavor Variations & Adaptations
Consider swapping half of the all-purpose flour for almond flour for an extra nutty taste, or add a touch of espresso powder to the batter to amplify the chocolate flavor. You could also layer in some raspberry jam between the cake layers for a fruity surprise!
Reader Questions & Solutions
-
Why did my cake sink in the middle?
This often occurs if the oven temperature was too low or if the batter was overmixed. Make sure to bake at the correct temperature and mix just until incorporated. -
Can I use a different type of frosting?
Absolutely! Cream cheese frosting or even a vanilla buttercream can be delightful alternatives. -
What adjustments do I need for high-altitude baking?
At higher altitudes, reduce the sugar slightly, increase the flour by a couple of tablespoons, and bake for a few extra minutes if needed. -
Is it okay to make this batter in advance?
You can make the batter a few hours ahead and refrigerate it, but it’s best to bake it fresh for the fluffiest results. -
Can I freeze the cake?
Yes! The baked layers can be wrapped tightly and frozen for up to three months. Just thaw them overnight in the fridge before frosting and serving.
Wrapping Up
Now that you have the step-by-step guide to creating your very own Decadent Chocolate Valentine’s Day Cake, I hope you feel inspired to get baking! There’s something truly rewarding about sharing a homemade cake, filled with love and care, with those you cherish. So preheat that oven, grab your favorite mixing bowl, and let’s make some delicious memories!
PrintDecadent Chocolate Valentine’s Day Cake

A simple yet sensational chocolate cake perfect for Valentine’s Day or any special occasion.
- Prep Time: 20 minutes
- Cook Time: 35 minutes
- Total Time: 55 minutes
- Yield: 12 servings 1x
- Category: Dessert
- Method: Baking
- Cuisine: American
- Diet: Vegetarian
Ingredients
- 1 3/4 cups all-purpose flour
- 1 3/4 cups granulated sugar
- 3/4 cup unsweetened cocoa powder
- 1 1/2 teaspoons baking powder
- 1 1/2 teaspoons baking soda
- 1 teaspoon salt
- 2 large eggs
- 1 cup whole milk
- 1/2 cup vegetable oil
- 2 teaspoons vanilla extract
- 1 cup boiling water
- Chocolate frosting
- Chocolate shavings or sprinkles (for decoration)
Instructions
- Preheat your oven to 350°F (175°C). Grease and flour two 9-inch round cake pans.
- In a large mixing bowl, whisk together flour, granulated sugar, cocoa powder, baking powder, baking soda, and salt until evenly mixed.
- Add the eggs, whole milk, vegetable oil, and vanilla extract to the dry ingredients. Mix until well combined.
- Carefully stir in the boiling water until the batter is smooth.
- Divide the batter evenly between the prepared cake pans.
- Bake for 30-35 minutes, or until a toothpick inserted in the center comes out clean.
- Let the cakes cool in the pans for 10 minutes before transferring them to wire racks to cool completely.
- Once the cakes are cool, spread chocolate frosting generously between the layers and on top.
- Decorate with chocolate shavings or sprinkles and serve.
Notes
For the best results, ensure that your eggs and milk are at room temperature before mixing. Don’t overmix the batter to avoid a dense cake.
Nutrition
- Serving Size: 1 slice
- Calories: 380
- Sugar: 42g
- Sodium: 350mg
- Fat: 12g
- Saturated Fat: 3g
- Unsaturated Fat: 5g
- Trans Fat: 0g
- Carbohydrates: 65g
- Fiber: 2g
- Protein: 5g
- Cholesterol: 35mg