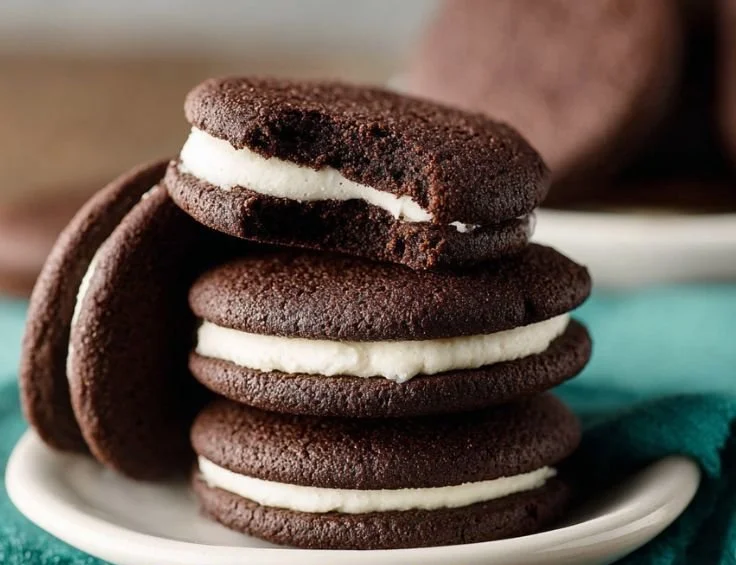
There’s something undeniably nostalgic about the classic Oreo cookie. It stirs memories of after-school snacks, dipping cookies into a glass of cold milk, and childhood indulgences that made the day just a little bit sweeter. But what if I told you that you could recreate that thrill in your own kitchen, tailored to your taste? Welcome to the magical world of Homemade Oreos—a treat that’s not only fun to make but also invites creative spins to this iconic favorite!
## Recipe Timing
- Prep Duration: 15 minutes
- Active Cooking: 10 minutes
- Total Duration: 25 minutes
- Portion Size: About 24 sandwich cookies
- Complexity: Simple
## Nutritional Recipe
- Calories per portion: Approximately 120
- Protein: 1g
- Carbs: 18g
- Fats: 6g
- Fiber: 1g
- Sugars: 10g
- Sodium: 50mg
## Why You’ll Love This Homemade Oreos
Imagine the joy of biting through a crisp, chocolatey shell only to discover a sweet, creamy filling awaiting you. This homemade version is not just a delicious replica; it’s a customizable treat that allows you to adjust sweetness, creaminess, or even add flavors of your own! You’re embracing not just the taste of nostalgia, but you’re also diving into the joy of crafting something sweet with your very own hands. Whether you’re making them for a party, gifts, or just to indulge in, these Homemade Oreos add a personal touch to your dessert game.
## The Complete Cooking Journey
Gathering in the kitchen to make Homemade Oreos means more than just following a recipe; it’s an opportunity to connect. Picture yourself mixing the rich cocoa powder and the butter, letting that fresh aroma fill your kitchen. Each step brings you closer to the final product—a batch of cookies that you’ll take pride in sharing. The process is straightforward and enjoyable, making it perfect for bakers of all experiences—embracing the cozy, delightful world of cookie-making is what this is all about!
## Ingredients:
- 1 1/4 cups all-purpose flour
- 1/2 cup unsweetened cocoa powder
- 1 cup granulated sugar
- 1/2 teaspoon baking soda
- 1/4 teaspoon salt
- 1/2 cup unsalted butter, softened
- 1 large egg
- 1 teaspoon vanilla extract
- 1/2 cup powdered sugar
- 1/4 cup unsweetened cocoa powder (for filling)
- 1/4 cup unsalted butter, softened (for filling)
- 1 teaspoon vanilla extract (for filling)
## Method:
### Step 1: Preheat the Oven
Preheat the oven to 350°F (175°C). This ensures your cookies will bake evenly for that perfect crunch!
### Step 2: Mix Dry Ingredients
In a bowl, mix together the flour, cocoa powder, baking soda, and salt. This step combines all the essential dry components and sets the foundation for that rich chocolate flavor.
### Step 3: Cream the Butter and Sugar
In another bowl, beat together the softened butter and granulated sugar until fluffy. This will create a light and airy texture—the base for your delicious cookie!
### Step 4: Add Egg and Vanilla
Beat in the egg and vanilla extract. At this stage, you’ll start to see the beautiful incorporation of flavors.
### Step 5: Combine the Mixtures
Gradually add the dry ingredients to the butter mixture, mixing until just combined. Do not overmix; you want that nice, soft, and moldable dough.
### Step 6: Shape the Cookie Dough
Roll the dough into small balls and place them on a baking sheet lined with parchment paper. Use the palms of your hands for this; there’s something therapeutic about the process!
### Step 7: Flatten and Bake
Gently flatten the balls slightly with your palm. Bake for 8-10 minutes, keeping an eye on them to ensure they don’t overbake. Your kitchen will soon be filled with an irresistible aroma.
### Step 8: Cool the Cookies
Once done, let the cookies cool completely on a wire rack. Patience is key here; it allows them to firm up before assembly.
### Step 9: Make the Cream Filling
For the filling, beat together the powdered sugar, cocoa powder, softened butter, and vanilla extract until smooth. You’re crafting that rich filling that’ll create the perfect sandwich!
### Step 10: Assemble Your Oreos
Spread the filling on one cookie and sandwich it with another. Voilà! Your homemade Oreos are ready to be enjoyed.
## Serving Suggestions & Pairings
Serve these delightful cookies with a glass of cold milk for that classic experience, or even a warm cup of coffee for a grown-up twist. These cookies also make fantastic gifts—pack them in clear bags tied with ribbons for a charming, homemade gift that anyone will appreciate.
## Storage & Leftovers Guide
Store any leftover cookies in an airtight container at room temperature for up to one week. If you want them to last longer, consider freezing them in a tight-sealing bag for up to three months. Just thaw them at room temperature when you’re ready to treat yourself!
## Kitchen Wisdom & Success Tips
- Make sure to keep your butter at room temperature to ensure a smooth creaming process.
- If you want to spice things up, try adding peppermint extract or orange zest to the filling—your taste buds will thank you!
- For a chewier cookie, slightly underbake to keep them soft and gooey.
## Flavor Variations & Adaptations
Feeling adventurous? Swap out the vanilla extract for almond extract, or add in some crushed mint leaves to your cream filling for a refreshing touch. You could even fold in some mini chocolate chips into the dough for added texture!
## Reader Questions & Solutions
-
Can I use whole wheat flour instead of all-purpose?
Yes, though the texture will change a bit, you can substitute up to half with whole wheat flour. -
What if my dough is too sticky?
Chill the dough in the refrigerator for 30 minutes, which should make it easier to handle. -
How can I make these gluten-free?
Use a gluten-free flour blend designed for baking, and your cookies should turn out just fine! -
Can I make the filling with alternative sweeteners?
Absolutely! You can swap granulated sugar with coconut sugar or stevia for a healthier version. -
How do I know when the cookies are done baking?
The edges should be set but the centers might still look slightly soft—this will ensure they stay chewy!
## Wrapping Up
Homemade Oreos are a wonderful way to invest time in the kitchen and bring a slice of nostalgia to your day. Whether you’re alone or with loved ones, the process of baking these cookies connects you with the love and joy that food brings. This recipe invites you to not just create something edible, but to savor the experience. So gather your ingredients, roll up your sleeves, and let the sweet aromas of Homemade Oreos fill your home! Happy baking!
PrintHomemade Oreos

Recreate the classic Oreo cookie at home with this fun and customizable recipe.
- Prep Time: 15 minutes
- Cook Time: 10 minutes
- Total Time: 25 minutes
- Yield: 24 sandwich cookies 1x
- Category: Dessert
- Method: Baking
- Cuisine: American
- Diet: Vegetarian
Ingredients
- 1 1/4 cups all-purpose flour
- 1/2 cup unsweetened cocoa powder
- 1 cup granulated sugar
- 1/2 teaspoon baking soda
- 1/4 teaspoon salt
- 1/2 cup unsalted butter, softened
- 1 large egg
- 1 teaspoon vanilla extract
- 1/2 cup powdered sugar
- 1/4 cup unsweetened cocoa powder (for filling)
- 1/4 cup unsalted butter, softened (for filling)
- 1 teaspoon vanilla extract (for filling)
Instructions
- Preheat the oven to 350°F (175°C).
- In a bowl, mix together the flour, cocoa powder, baking soda, and salt.
- In another bowl, beat together the softened butter and granulated sugar until fluffy.
- Beat in the egg and vanilla extract.
- Gradually add the dry ingredients to the butter mixture, mixing until just combined.
- Roll the dough into small balls and place them on a baking sheet lined with parchment paper.
- Gently flatten the balls slightly with your palm.
- Bake for 8-10 minutes or until edges are firm.
- Let the cookies cool completely on a wire rack.
- For the filling, beat together the powdered sugar, cocoa powder, softened butter, and vanilla extract until smooth.
- Spread the filling on one cookie and sandwich it with another.
Notes
Store leftover cookies in an airtight container for up to one week or freeze them for longer storage.
Nutrition
- Serving Size: 1 sandwich cookie
- Calories: 120
- Sugar: 10g
- Sodium: 50mg
- Fat: 6g
- Saturated Fat: 2g
- Unsaturated Fat: 4g
- Trans Fat: 0g
- Carbohydrates: 18g
- Fiber: 1g
- Protein: 1g
- Cholesterol: 15mg