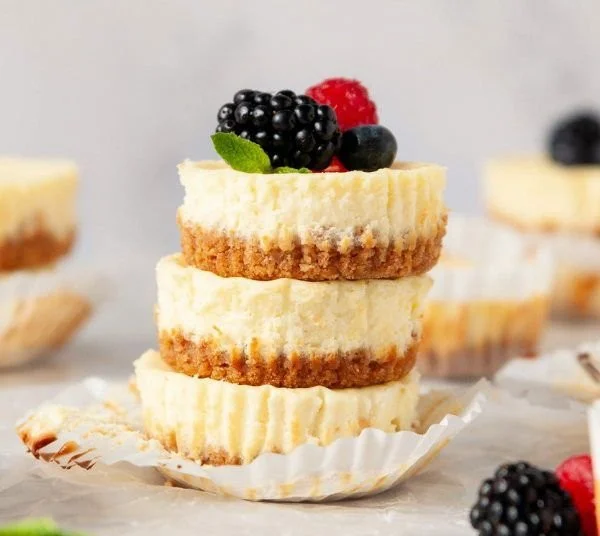
As I stood in my kitchen, sunlight poured through the window, revealing the dusty countertop that had seen countless cooking escapades. I was craving something sweet yet nutritious—something that wouldn’t compromise my healthy eating goals. That’s when I remembered my beloved mini protein cheesecakes. They’re small, delightful bites that pack a punch of flavor and protein, making them the perfect guilt-free treat. The creamy texture, combined with a hint of lemon zest, always takes me back to warm family gatherings. These mini cheesecakes are not just a recipe; they are a celebration of good health and happiness.
Recipe Timing
- Prep Duration: 15 minutes
- Active Cooking: 25 minutes
- Total Duration: 2 hours 40 minutes (including chilling time)
- Portion Size: 12 mini cheesecakes
- Complexity: Simple
Nutritional Recipe
- Calories per portion: Approximately 130
- Protein: 10g per serving
- Carbs: 10g per serving
- Fats: 4g per serving
- Fiber: 1g per serving
- Sugars: 5g per serving
- Sodium: 200mg per serving
Why You’ll Love This Mini Protein Cheesecakes (Healthy & Gluten Free)
These mini protein cheesecakes are the ideal amalgamation of flavor and nutrition. They fit seamlessly into a balanced diet, ensuring that you can enjoy a bite of sweetness without the guilt. With their creamy filling and crunchy crust, they satisfy every dessert craving while providing a significant protein boost. Plus, they’re gluten-free, making them a fantastic option for anyone with dietary restrictions. Trust me; these little treats will become a staple in your kitchen!
The Complete Cooking Journey
Let me guide you through the steps to create your very own mini protein cheesecakes. With just a handful of ingredients, you’ll create a deliciously creamy, protein-packed dessert that is perfect for meal prepping or serving at gatherings. Grab your apron, and let’s get started!
Ingredients:
- 2 cups cottage cheese
- 1 cup Greek yogurt
- 1/2 cup protein powder
- 1/4 cup honey or maple syrup
- 1 teaspoon vanilla extract
- 1 teaspoon lemon juice
- 1/2 cup crushed graham crackers or almond flour (for crust)
- Cooking spray or paper liners (for baking cups)
Method:
Step 1: Preheat Your Oven
Preheat your oven to 350°F (175°C).
Step 2: Blend the Filling
In a blender or food processor, combine cottage cheese, Greek yogurt, protein powder, honey, vanilla extract, and lemon juice. Blend until smooth and creamy, ensuring that there are no lumps. This creamy concoction will be the star of your cheesecakes!
Step 3: Prepare the Crust
In a separate bowl, mix crushed graham crackers or almond flour with a little honey or melted coconut oil. This will help bind your crust and give it that delicious, crunchy texture.
Step 4: Line Your Muffin Tin
Line a muffin tin with paper liners or spray with cooking spray to ensure easy removal of your cheesecakes later.
Step 5: Press the Crust Mixture
Press the crust mixture into the bottom of each muffin cup. Use your fingers or the back of a spoon to pack it down tightly. This step is crucial for that satisfying crunch!
Step 6: Pour the Cheesecake Mixture
Pour the cheesecake mixture over the crust until each muffin cup is filled. Don’t worry if it looks a bit messy; these beauties will bake up perfectly.
Step 7: Bake Your Cheesecakes
Bake for 20-25 minutes, or until the cheesecakes are set in the middle. They should slightly wiggle but not be jiggly.
Step 8: Cool and Refrigerate
Allow to cool in the pan before transferring to the fridge. Chill for at least 2 hours to let the flavors meld and the texture firm up.
Step 9: Serve and Enjoy!
Once chilled, serve your mini protein cheesecakes and enjoy these bites of joy!
Serving Suggestions & Pairings
Serve these delightful mini cheesecakes with fresh berries or a dollop of plain Greek yogurt for an extra protein boost. They also pair wonderfully with a light herbal tea or a refreshing glass of sparkling water.
Storage & Leftovers Guide
Store any leftovers in an airtight container in the refrigerator for up to 5 days. If you’re planning ahead, they also freeze well; just remember to wrap them individually!
Kitchen Wisdom & Success Tips
- Make sure to blend the cheesecake mixture until completely smooth for the creamiest texture.
- If you’re short on time, using almond flour for the crust is a great gluten-free alternative that needs no baking.
- Feel free to add in some dark chocolate chips or lemon zest for an extra flavor twist!
Flavor Variations & Adaptations
- Chocolate Lovers: Add cocoa powder to the filling for a chocolate twist.
- Fruit Infusion: Swirl in some fruit puree or top with fresh fruit after baking.
- Nutty Delight: Replace the honey with a nut butter for a different taste experience.
Reader Questions & Solutions
-
Can I use non-dairy yogurt?
Yes! You can substitute Greek yogurt for any non-dairy option to keep it dairy-free. -
What if I don’t have protein powder?
You can skip it or use more Greek yogurt, but the cheesecakes will be less protein-rich. -
Can I make this in advance?
Absolutely! These cheesecakes hold up well in the refrigerator and are perfect for meal prep. -
What can I use instead of graham crackers?
Almond flour or ground oats make excellent substitutes for a gluten-free crust. -
How do I know if it’s baked enough?
The edges should be set, and the center will jiggle slightly. It will firm up after cooling in the refrigerator.
Wrapping Up
These mini protein cheesecakes are more than just a quick dessert; they are a journey into healthy indulgence. I hope you find joy in preparing them as much as I do. With each bite, you’re not only treating yourself but also nourishing your body. So gather your ingredients, whip up this recipe, and explore the delightful world of healthy desserts. Happy baking!
PrintMini Protein Cheesecakes
Deliciously creamy mini protein cheesecakes that are healthy, gluten-free, and packed with flavor.
- Prep Time: 15 minutes
- Cook Time: 25 minutes
- Total Time: 160 minutes
- Yield: 12 servings 1x
- Category: Dessert
- Method: Baking
- Cuisine: American
- Diet: Gluten-Free
Ingredients
- 2 cups cottage cheese
- 1 cup Greek yogurt
- 1/2 cup protein powder
- 1/4 cup honey or maple syrup
- 1 teaspoon vanilla extract
- 1 teaspoon lemon juice
- 1/2 cup crushed graham crackers or almond flour (for crust)
- Cooking spray or paper liners (for baking cups)
Instructions
- Preheat your oven to 350°F (175°C).
- Blend the cottage cheese, Greek yogurt, protein powder, honey, vanilla extract, and lemon juice in a blender or food processor until smooth and creamy.
- Prepare the crust by mixing crushed graham crackers or almond flour with honey or melted coconut oil in a separate bowl.
- Line a muffin tin with paper liners or spray with cooking spray.
- Press the crust mixture into the bottom of each muffin cup tightly.
- Pour the cheesecake mixture over the crust until each muffin cup is filled.
- Bake for 20-25 minutes, or until the cheesecakes are set in the middle but still slightly wiggly.
- Cool in the pan then transfer to the fridge and chill for at least 2 hours.
- Serve and enjoy your mini protein cheesecakes!
Notes
Store leftovers in an airtight container in the refrigerator for up to 5 days. These cheesecakes also freeze well if wrapped individually.
Nutrition
- Serving Size: 1 cheesecake
- Calories: 130
- Sugar: 5g
- Sodium: 200mg
- Fat: 4g
- Saturated Fat: 1g
- Unsaturated Fat: 3g
- Trans Fat: 0g
- Carbohydrates: 10g
- Fiber: 1g
- Protein: 10g
- Cholesterol: 15mg