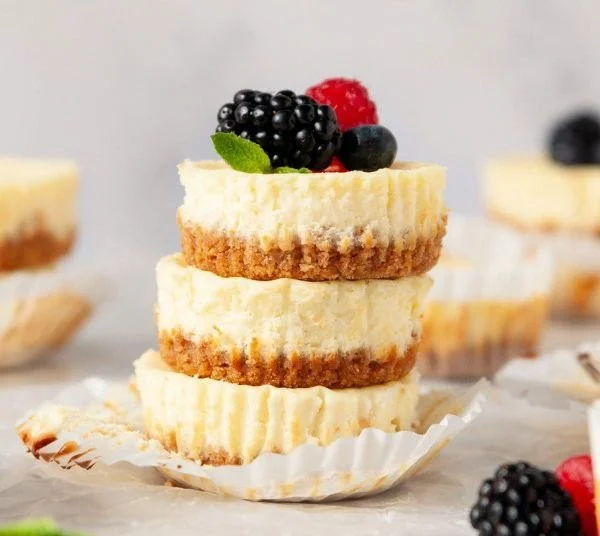
There’s something magical about miniature desserts. They pack all the indulgence of their larger counterparts into bite-sized morsels, making them perfect for sharing—or, let’s be honest, sneaking an extra one (or two!) when no one is looking. Enter the Mini Protein Cheesecakes! These delightful little treats are not only delightful to eat but also pretty healthy, making them an excellent choice for both dessert lovers and those mindful of their nutrition.
I remember the first time I made these cheesecakes for a gathering. Friends piled into my kitchen, laughter and excitement filling the air as we prepped together. I didn’t just want to bring another cake; I wanted something that would make them curious and enchanted. As the cheesecakes baked, the sweet aroma of vanilla and a hint of lemon wafted through my kitchen, instantly winning over my crew. By the time I pulled them from the oven, we were all eagerly anticipating the taste. And I must say, they did not disappoint. They were creamy, packed with protein, and topped with vibrant fresh berries, a perfect tribute to the shared joy of cooking and eating together.
Recipe Timing
- Prep Duration: 15 minutes
- Active Cooking: 30 minutes
- Total Duration: 3 hours 45 minutes (includes chilling time)
- Portion Size: 12 mini cheesecakes
- Complexity: Simple
Nutritional Recipe
- Calories per portion: Approximately 105 kcal
- Protein: 6 grams
- Carbs: 10 grams
- Fats: 5 grams
- Fiber: 0 grams
- Sugars: 5 grams
- Sodium: 124 mg
Why You’ll Love This Mini Protein Cheesecakes
These Mini Protein Cheesecakes are perfect for anyone looking to enjoy a guilt-free dessert. They are protein-packed thanks to the Greek yogurt and cream cheese, which means you can enjoy your sweets without feeling remorse. The balance of sweet and tangy from the lemon juice and zest complements the richness of the cream cheese beautifully, creating a cheesecake that is creamy without being overly heavy. Plus, their small size means they fit perfectly into lunchboxes or as a post-workout snack.
The Complete Cooking Journey
Let’s embark on this delicious journey to create these delightful mini cheesecakes—let’s go!
Ingredients:
- 1 ½ cups graham cracker crumbs (gluten-free if needed (about 10 sheets))
- 5 Tbsp salted butter (melted)
- 8 oz cream cheese (room temperature (regular or low fat if desired))
- ¾ cup plain 0% Greek yogurt (room temperature)
- ⅓ cup granulated sugar
- 1 egg + 1 yolk
- 1 tsp vanilla extract
- 2 tsp lemon juice
- ¼ – ½ tsp lemon zest (optional if you want a lemony cheesecake)
- 1 Tbsp arrowroot starch or cornstarch
Method:
Step 1: Preheat the Oven and Prepare the Tin
Preheat your oven to 350°F and line a cupcake tin with 12 liners. This is the first step to create that perfect little crust.
Step 2: Create the Graham Cracker Crust
Add graham crackers to a food processor and pulse until they are crumbs. Add in the melted butter and pulse until combined. If you don’t have a food processor, place the crackers in a plastic bag and pound them with a rolling pin until they resemble fine crumbs. Then, mix the crumbs and melted butter in a bowl.
Step 3: Pack the Crust Mixture
Divide the crumbs evenly amongst muffin liners (about 1.5 tablespoons each). Use your fingers to flatten and pack the crumbs firmly in the bottom.
Step 4: Bake the Crust
Bake for 5 – 6 minutes until slightly golden. Remove from the oven and let cool for 5 – 10 minutes while you prepare the filling.
Step 5: Make the Cheesecake Filling
While the crust cools, add cream cheese to a large mixing bowl and beat with a handheld electric mixer until smooth. This is where the magic begins!
Step 6: Combine Ingredients
Add Greek yogurt, egg, egg yolk, sugar, vanilla extract, lemon juice, lemon zest, and arrowroot powder to the bowl. On the lowest setting, mix again until smooth for 30 – 60 seconds. Be careful—overbeating can lead to cracks in your cheesecakes!
Step 7: Fill the Muffin Liners
Divide the cheesecake filling evenly amongst the muffin liners. This should barrel you in anticipation for the yumminess ahead.
Step 8: Bake the Cheesecakes
Bake for 17 – 20 minutes, or until the filling has just set. The surface should not jiggle or look wet, indicating they’re ready to come out.
Step 9: Cool Down
Let cool for 30 minutes at room temperature before transferring to the refrigerator. This is key for ensuring the perfect texture.
Step 10: Chill and Enjoy!
Chill for at least 3 hours. Once chilled, top with fresh berries and small mint leaves. Now, it’s time for the grand reveal—enjoy every luscious bite!
Serving Suggestions & Pairings
These mini protein cheesecakes are delightful on their own but can also be paired with a drizzle of honey or a dollop of homemade berry compote for an added burst of flavor. Serve them alongside some fresh fruit or a vibrant green salad for a balanced dessert experience. They also pair beautifully with a cup of herbal tea or a rich dark coffee.
Storage & Leftovers Guide
Store any leftovers in an airtight container in the refrigerator for up to a week. These cheesecakes can also be frozen for up to a month! Simply thaw in the fridge overnight before serving for best results.
Kitchen Wisdom & Success Tips
- Ensure that your cream cheese and Greek yogurt are at room temperature for a smooth filling.
- If you find the cheesecake is too sweet for your liking, feel free to adjust the sugar down to taste.
- A flexible muffin tin can help in getting the cheesecakes out of the liners intact.
Flavor Variations & Adaptations
Feel free to swap in different flavors! Try adding a tablespoon of cocoa powder to make chocolate cheesecakes or fold in mini chocolate chips before baking. For a tropical twist, add coconut extract and top with crushed pineapple. The possibilities are endless!
Reader Questions & Solutions
-
Q: Can I use a different type of crust?
A: Absolutely! You can try almond flour or crushed nuts combined with melted butter for a nut-based crust. -
Q: What if I don’t have Greek yogurt?
A: You can substitute with regular yogurt, but the texture may be slightly different. -
Q: How do I know when they are done baking?
A: The cheesecakes should look set and not jiggle when you gently shake the pan. A toothpick inserted in the center should come out clean. -
Q: Can I skip the lemon juice and zest?
A: Yes, but they add a refreshing brightness to the flavor. You can replace them with orange zest for a different citrus twist! -
Q: Can I make these mini cheesecakes vegan?
A: Yes! You can use vegan cream cheese and a flax egg as a substitute for the egg in the filling.
Wrapping Up
I hope this recipe for Mini Protein Cheesecakes excites your cooking spirit! It’s a wonderful chance to create something sweet and share it with loved ones (just beware of the chocolate devourers!). Whether it’s a family gathering or a quiet evening treat, these little bites of happiness are bound to make your day a little sweeter. Happy baking!
PrintMini Protein Cheesecakes
Delightful bite-sized cheesecakes that are creamy, protein-packed, and topped with fresh berries, perfect for sharing.
- Prep Time: 15 minutes
- Cook Time: 30 minutes
- Total Time: 225 minutes
- Yield: 12 mini cheesecakes 1x
- Category: Dessert
- Method: Baking
- Cuisine: American
- Diet: High Protein
Ingredients
- 1 ½ cups graham cracker crumbs
- 5 Tbsp salted butter, melted
- 8 oz cream cheese, room temperature
- ¾ cup plain 0% Greek yogurt, room temperature
- ⅓ cup granulated sugar
- 1 egg + 1 yolk
- 1 tsp vanilla extract
- 2 tsp lemon juice
- ¼ – ½ tsp lemon zest (optional)
- 1 Tbsp arrowroot starch or cornstarch
Instructions
- Preheat your oven to 350°F and line a cupcake tin with 12 liners.
- Add graham crackers to a food processor and pulse until they are crumbs. Add in the melted butter and pulse until combined.
- Divide the crumbs evenly amongst muffin liners (about 1.5 tablespoons each) and pack firmly.
- Bake for 5 – 6 minutes until slightly golden and let cool for 5 – 10 minutes.
- Add cream cheese to a mixing bowl and beat until smooth.
- Mix in Greek yogurt, egg, egg yolk, sugar, vanilla, lemon juice, lemon zest, and arrowroot until smooth.
- Fill the muffin liners evenly with the filling.
- Bake for 17 – 20 minutes, or until the filling has just set.
- Let cool for 30 minutes at room temperature before refrigerating.
- Chill for at least 3 hours, then top with fresh berries.
Notes
Store leftovers in an airtight container in the refrigerator for up to a week. These can also be frozen for up to a month.
Nutrition
- Serving Size: 1 cheesecake
- Calories: 105
- Sugar: 5g
- Sodium: 124mg
- Fat: 5g
- Saturated Fat: 3g
- Unsaturated Fat: 2g
- Trans Fat: 0g
- Carbohydrates: 10g
- Fiber: 0g
- Protein: 6g
- Cholesterol: 30mg