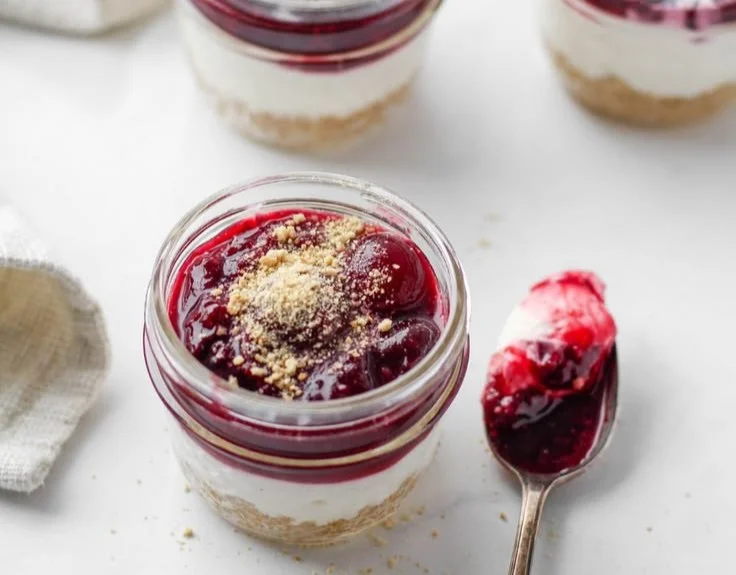
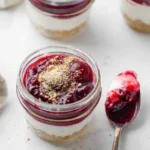
Have you ever had that delightful moment when you stumble upon a treat that not only satisfies your sweet tooth but also leaves you feeling good about what you’ve just indulged in? For me, it was when I first encountered No Bake Cheesecake in a Jar, a creation that combines the classic creamy decadence of cheesecake with the refreshing convenience of a portable dessert. With the guiding hand of Hannah Magee, RD, I’ve transformed this traditional favorite into a lightened-up version that allows us to enjoy dessert without the guilt. Imagine the smooth, rich filling perfectly layered over a crumbly, yet wholesome base, calling out for a spoonful as you cozy up on your couch. Let’s dive into the details of this enchanting dessert that’s perfect for almost any occasion.
Recipe Timing
- Prep Duration: 15 minutes
- Active Cooking: 0 minutes (no baking required!)
- Total Duration: 15 minutes
- Portion Size: Serves 4
- Complexity: Simple
Nutritional Recipe
- Calories per portion: About 180
- Protein: 8 grams
- Carbs: 24 grams
- Fats: 6 grams
- Fiber: 1 gram
- Sugars: 9 grams
- Sodium: 75 mg
Why You’ll Love This No Bake Cheesecake in a Jar (Lightened Up/Healthy) – Hannah Magee RD
There’s something undeniably satisfying about enjoying a dessert that’s both creamy and guilt-free. This No Bake Cheesecake in a Jar is responsible indulgence at its best. The combination of cream cheese and Greek yogurt provides a rich texture while naturally cutting down on excess sugars and calories. Layering it in a jar not only makes for a beautiful presentation but also gives each spoonful a delightful crunch from the base and smoothness from the cheesecake filling. It’s an easy treat to whip up, making it perfect for busy days or spontaneous gatherings. Whether you need a sweet finish to a family dinner or are looking for a perfect picnic snack, this cheesecake in a jar hits all the right notes!
The Complete Cooking Journey
From the first moment I mixed together the ingredients to the last spoonful enjoyed, creating this dessert was a delightful journey. The best part? It’s so quick and easy, you’ll find yourself making it again and again.
Ingredients:
- 1 cup graham cracker crumbs
- 2 tablespoons melted coconut oil or butter
- 2 tablespoons honey or maple syrup
- 8 oz cream cheese, softened
- 1 cup non-fat Greek yogurt
- 1/2 cup powdered sugar (or to taste)
- 1 teaspoon vanilla extract
- Fresh berries for topping (e.g., strawberries, blueberries)
Method:
Step 1: Prepare the Base
In a mixing bowl, combine the graham cracker crumbs with melted coconut oil (or butter) and honey (or maple syrup). Mix well until the crumbs are well-coated and resemble wet sand. Divide this mixture evenly among your jars, pressing firmly down to create a solid base.
Step 2: Make the Cheesecake Filling
In a separate bowl, beat the softened cream cheese until creamy. Add the Greek yogurt, powdered sugar, and vanilla extract to the bowl. Mix until everything is well-blended and smooth. Taste and adjust sweetness if desired.
Step 3: Layer the Jars
Spoon a generous layer of the cheesecake filling on top of the graham cracker base in each jar. Use a spatula or the back of a spoon to smooth out the top for an elegant finish.
Step 4: Chill
Cover the jars with lids or plastic wrap and place them in the refrigerator for at least 1 hour to chill. This step allows the flavors to meld beautifully, creating a more delicious dessert.
Step 5: Garnish & Serve
When you’re ready to enjoy, remove the jars from the fridge and top with fresh berries. The addition of berries not only enhances the flavor but also adds a pop of color to your dessert.
Serving Suggestions & Pairings
These elegant jars of cheesecake are perfect on their own, but if you’re feeling adventurous, pair them with a cup of hot coffee or herbal tea to balance the sweetness. They’re also delightful at parties or as post-dinner treats. Consider layering in some additional flavors, like crushed nuts or chocolate shavings, for an extra twist!
Storage & Leftovers Guide
Store any leftovers in the fridge for up to 3 days. Just remember to keep the lids on tightly to maintain freshness. If you’re making them ahead of time, they can last up to a week in the refrigerator—ideal for meal prep!
Kitchen Wisdom & Success Tips
- Room Temperature Ingredients: Make sure your cream cheese is softened to room temperature for easier mixing.
- Sweetness Control: Adjust the sweetness of the filling based on personal preference.
- Mix-It-Up: Don’t be afraid to experiment with different flavored extracts (like almond or citrus) for a unique twist.
Flavor Variations & Adaptations
Feeling creative? Try adding lemon or lime zest for a refreshing citrus note. You can also swap the graham cracker base for crushed cookies or nuts to suit your taste. For a chocolate variation, mix in cocoa powder into the cheesecake filling for a decadent chocolate experience!
Reader Questions & Solutions
-
Q: How can I make it dairy-free?
A: Substitute cream cheese with a dairy-free alternative and use coconut yogurt instead of Greek yogurt. -
Q: Can I use a different sweetener?
A: Absolutely! Feel free to use stevia, agave, or any sweetener that fits your dietary needs. -
Q: What can I use instead of graham crackers?
A: Ground oats, almond flour, or even crushed gluten-free cookies can work wonderfully. -
Q: How can I make this a chocolate cheesecake?
A: Add cocoa powder to the filling (about 1/4 cup) for a delightful chocolate twist! -
Q: Can I make these ahead of time?
A: Yes! These jars are perfect for prepping in advance, making your life easier on busy days.
Wrapping Up
This No Bake Cheesecake in a Jar proves that dessert can be both indulgent and healthy. With minimal effort and maximum flavor, you can treat yourself to this delightful creation any day of the week. So, grab those jars and your favorite toppings, and let your kitchen creativity shine. Happy cooking, and even happier indulging!
PrintNo Bake Cheesecake in a Jar
A lightened-up version of the classic cheesecake, this No Bake Cheesecake in a Jar offers creamy decadence without the guilt.
- Prep Time: 15 minutes
- Cook Time: 0 minutes
- Total Time: 15 minutes
- Yield: 4 servings 1x
- Category: Dessert
- Method: No Bake
- Cuisine: American
- Diet: Vegetarian
Ingredients
- 1 cup graham cracker crumbs
- 2 tablespoons melted coconut oil or butter
- 2 tablespoons honey or maple syrup
- 8 oz cream cheese, softened
- 1 cup non-fat Greek yogurt
- 1/2 cup powdered sugar (or to taste)
- 1 teaspoon vanilla extract
- Fresh berries for topping (e.g., strawberries, blueberries)
Instructions
- Prepare the Base: In a mixing bowl, combine the graham cracker crumbs with melted coconut oil (or butter) and honey (or maple syrup). Mix well until the crumbs are well-coated and resemble wet sand. Divide this mixture evenly among your jars, pressing firmly down to create a solid base.
- Make the Cheesecake Filling: In a separate bowl, beat the softened cream cheese until creamy. Add the Greek yogurt, powdered sugar, and vanilla extract to the bowl. Mix until everything is well-blended and smooth. Taste and adjust sweetness if desired.
- Layer the Jars: Spoon a generous layer of the cheesecake filling on top of the graham cracker base in each jar. Use a spatula or the back of a spoon to smooth out the top for an elegant finish.
- Chill: Cover the jars with lids or plastic wrap and place them in the refrigerator for at least 1 hour to chill. This step allows the flavors to meld beautifully, creating a more delicious dessert.
- Garnish & Serve: When you’re ready to enjoy, remove the jars from the fridge and top with fresh berries. The addition of berries not only enhances the flavor but also adds a pop of color to your dessert.
Notes
Perfect for busy days or spontaneous gatherings. Can be stored in the fridge for up to 3 days.
Nutrition
- Serving Size: 1 serving
- Calories: 180
- Sugar: 9g
- Sodium: 75mg
- Fat: 6g
- Saturated Fat: 3g
- Unsaturated Fat: 3g
- Trans Fat: 0g
- Carbohydrates: 24g
- Fiber: 1g
- Protein: 8g
- Cholesterol: 30mg