There’s nothing quite like the joy of baking a cake that feels both familiar and indulgent. As I sift through my pantry, the sight of those iconic black and white cookies — Oreos — brings a wave of nostalgia crashing over me. They remind me of lazy afternoons spent dunking them in milk, excitedly sharing stories with friends while savoring every cookie crumb. Today, I’m taking that childhood pleasure and transforming it into a delightful Oreo Cake recipe that will surely put a smile on any face.
Imagine sinking your fork into luscious layers of moist chocolate cake, each bite interspersed with crunchy bits of Oreo cookies. The aroma wafting through your kitchen as the cake bakes will draw everyone in, evoking an eagerness to please their sweet tooth. So, grab your apron, and let’s embark on this delicious baking adventure together!
Recipe Timing
- Prep Duration: 20 minutes
- Active Cooking: 35 minutes
- Total Duration: 55 minutes (plus cooling time)
- Portion Size: 8-10 servings
- Complexity: Simple
Nutritional Recipe
- Calories per portion: Approximately 350
- Protein: 5g
- Carbs: 54g
- Fats: 14g
- Fiber: 2g
- Sugars: 30g
- Sodium: 300mg
Why You’ll Love This Oreo Cake
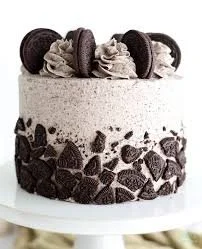
This Oreo Cake is a celebration of textures and flavors. With its rich cocoa base and surprise cookie chunks hiding within, this cake combines deep chocolate richness with the nostalgic crunch of Oreos, making it a perfect dessert for birthdays, celebrations, or simply a treat during a cozy night in. The chocolate frosting adds an extra layer of decadence, ensuring that each slice is a delightful experience that’s sure to be repeated again and again.
The Complete Cooking Journey
Baking this cake is an easy and rewarding experience. From the moment you gather your ingredients to the last step of decorating your masterpiece, you’ll feel a sense of satisfaction in every whisk and fold. Let’s dive into the details of making this delightful treat!
Ingredients:
- 2 cups all-purpose flour
- 1 3/4 cups granulated sugar
- 3/4 cup unsweetened cocoa powder
- 1 1/2 teaspoons baking powder
- 1 1/2 teaspoons baking soda
- 1 teaspoon salt
- 2 large eggs
- 1 cup whole milk
- 1/2 cup vegetable oil
- 2 teaspoons vanilla extract
- 1 cup boiling water
- 15 Oreo cookies, chopped
Method:
Step 1: Preheat Your Oven
Preheat your oven to 350°F (175°C) and prepare two 9-inch round cake pans by greasing and flouring them. This will ensure your cakes come out smoothly without sticking.
Step 2: Whisk Together Dry Ingredients
In a large mixing bowl, sift together the flour, sugar, cocoa powder, baking powder, baking soda, and salt. This helps to aerate the mixture, giving your cake a fluffy texture.
Step 3: Combine Wet Ingredients
Add the eggs, milk, oil, and vanilla extract to the dry ingredients. Mix until everything is well combined and smooth.
Step 4: Incorporate Boiling Water
Carefully stir in the boiling water. Be prepared; the batter will be quite thin — this is what helps create that moist cake you’re dreaming of! Afterward, fold in the chopped Oreo cookies for those delightful chocolatey bits in each bite.
Step 5: Divide Batter
Divide the batter evenly between the prepared cake pans, making sure the layers are equal for even baking.
Step 6: Bake to Perfection
Place the pans in your preheated oven and bake for 30-35 minutes. You’ll know the cakes are done when a toothpick inserted into the center comes out clean.
Step 7: Cool Your Cakes
Allow the cakes to cool in the pans for about 10 minutes. Then transfer them to a wire rack to cool completely. This cooling step is essential to avoid melting your frosting.
Step 8: Frost and Decorate
Once completely cool, frost with your favorite chocolate frosting. For that extra touch of Oreo flair, decorate the top with additional Oreo cookies. Your cake is now ready to shine!
Serving Suggestions & Pairings
Serve this cake with a scoop of vanilla ice cream or a dollop of whipped cream for a classic touch. For a fun twist, drizzle some chocolate syrup or caramel on top. This cake pairs beautifully with a glass of cold milk or a steaming cup of coffee.
Storage & Leftovers Guide
Leftover cake? No problem! Keep your Oreo Cake in an airtight container at room temperature for up to 3 days, or refrigerate for about a week. You can also freeze individual slices wrapped in plastic wrap for up to 3 months — perfect for a sweet treat on a busy day!
Kitchen Wisdom & Success Tips
- Ingredient Temperature: Make sure that your eggs and milk are at room temperature for an even batter.
- Measuring Flour: Use the spoon and level method to measure your flour correctly — it ensures a lighter cake.
- Folding Technique: When adding the Oreos, use a gentle folding motion to maintain airiness in the batter.
Flavor Variations & Adaptations
You can easily adapt this recipe by substituting the cocoa powder with chocolate cake mix for a super quick version. Want a little crunch? Add nuts or use peanut butter frosting instead! If you’re feeling adventurous, try a cream cheese frosting for a different flavor profile.
Reader Questions & Solutions
-
Why did my cake sink?
- Ensure you’re measuring ingredients correctly and not opening the oven door too early while baking.
-
How can I prevent my cake from sticking?
- Greasing and flouring the pans thoroughly helps, and using parchment paper on the bottom can be a safe bet.
-
What if I don’t have whole milk?
- You can substitute with 2% milk or even almond milk, though it may impact the richness slightly.
-
Can I use different cookies?
- Absolutely! Try using chocolate chip cookies or even graham crackers for a different twist.
-
How can I add more Oreo flavor?
- Crumble additional Oreos into the frosting or even add some to the batter for more texture.
Wrapping Up
This Oreo Cake is a delicious tribute to a classic childhood favorite. Whether you’re celebrating a special occasion or just treating yourself, this cake is sure to impress. Remember, baking is all about the journey and the joy it brings to those who share in it — including you! So, embrace the batter, savor the process, and most importantly, enjoy every scrumptious bite of this indulgent creation. Happy baking!
PrintOreo Cake

A delightful Oreo Cake that combines rich chocolate layers with crunchy bits of Oreos, perfect for any celebration.
- Prep Time: 20 minutes
- Cook Time: 35 minutes
- Total Time: 55 minutes
- Yield: 8-10 servings 1x
- Category: Dessert
- Method: Baking
- Cuisine: American
- Diet: Vegetarian
Ingredients
- 2 cups all-purpose flour
- 1 3/4 cups granulated sugar
- 3/4 cup unsweetened cocoa powder
- 1 1/2 teaspoons baking powder
- 1 1/2 teaspoons baking soda
- 1 teaspoon salt
- 2 large eggs
- 1 cup whole milk
- 1/2 cup vegetable oil
- 2 teaspoons vanilla extract
- 1 cup boiling water
- 15 Oreo cookies, chopped
Instructions
- Preheat your oven to 350°F (175°C) and prepare two 9-inch round cake pans by greasing and flouring them.
- Whisk together the flour, sugar, cocoa powder, baking powder, baking soda, and salt.
- Combine the eggs, milk, oil, and vanilla extract with the dry ingredients.
- Incorporate the boiling water carefully, then fold in the chopped Oreo cookies.
- Divide the batter evenly between the prepared cake pans.
- Bake in the oven for 30-35 minutes until a toothpick comes out clean.
- Cool the cakes in the pans for about 10 minutes, then transfer to a wire rack to cool completely.
- Frost with chocolate frosting and decorate with additional Oreo cookies.
Notes
For added flavor, serve with vanilla ice cream or whipped cream.
Nutrition
- Serving Size: 1 slice
- Calories: 350
- Sugar: 30g
- Sodium: 300mg
- Fat: 14g
- Saturated Fat: 6g
- Unsaturated Fat: 8g
- Trans Fat: 0g
- Carbohydrates: 54g
- Fiber: 2g
- Protein: 5g
- Cholesterol: 70mg