
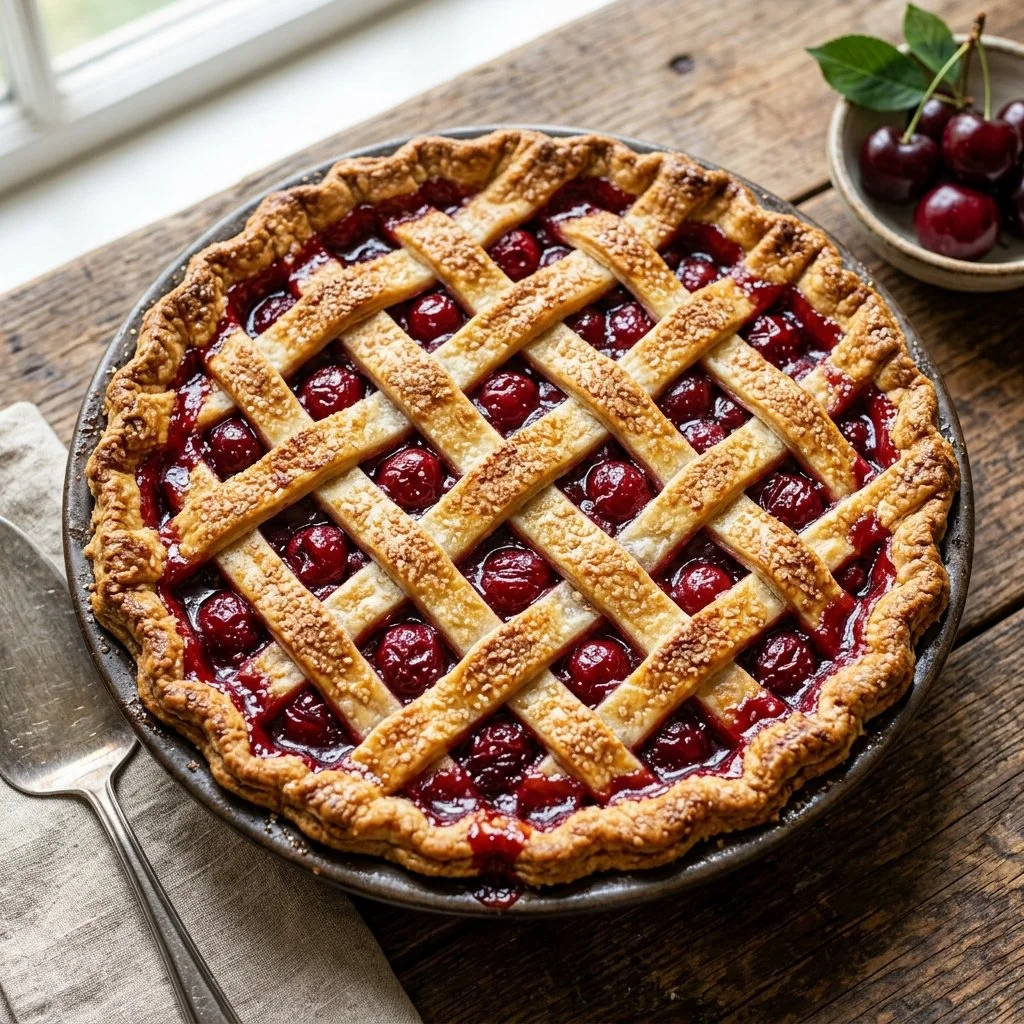
There’s something undeniably enchanting about a freshly baked cherry pie. Perhaps it’s the rich, sweet-tart aroma wafting through the kitchen, or the visual delight of golden crust and bubbling red filling. For me, cherry pie holds a treasure trove of memories—from summer harvests spent picking cherries with my grandmother to cozy family gatherings where this pie stole the show. Each slice is a slice of nostalgia, with drizzles of nostalgia glistening alongside the glossy cherries. Today, I invite you to create your own cherry pie magic, bringing warmth and love to your table.
Recipe Timing
- Prep Duration: 15 minutes
- Active Cooking: 15 minutes
- Total Duration: 1 hour
- Portion Size: Serves 8
- Complexity: Simple
Nutritional Recipe
- Calories per portion: Approximately 250
- Protein: 2 g
- Carbs: 40 g
- Fats: 10 g
- Fiber: 2 g
- Sugars: 20 g
- Sodium: 150 mg
Why You’ll Love This Cherry Pie
Cherry pie is the epitome of comfort food—it’s the dessert that effortlessly bridges the gap between tradition and modernity. The luscious cherries, whether fresh or frozen, blend harmoniously with just the right sweetness and a hint of tartness from lemon juice. Combined with a flaky pie crust, it promises a delightful contrast between textures with every bite. It’s the perfect centerpiece for any meal, bringing friends and family together for laughter, conversations, and memories.
The Complete Cooking Journey
Creating this cherry pie is a delightful journey, beginning with the preparation of the colorful filling. We’ll simmer cherries with sugar, cornstarch, lemon juice, and vanilla until it bubbles invitingly, surrendering all its flavors. Then, it’s time to transform that enticing mixture into a pie—a hands-on experience that fills your kitchen with joy. Once baked, the wait will feel like an eternity, but trust me, it’s worth every second when you finally cut into that golden crust.
Ingredients:
- 2 cups fresh or frozen cherries
- 1 cup sugar
- 2 tablespoons cornstarch
- 1 tablespoon lemon juice
- 1 teaspoon vanilla extract
- 1 tablespoon butter
- 1 pie crust (store-bought or homemade)
- 1 egg (for egg wash)
Method:
Step 1: Preheat the Oven
Preheat your oven to 425°F (220°C). This will set the stage for achieving that perfect golden crust.
Step 2: Combine Ingredients for Cherry Filling
In a pot, combine the cherries, sugar, cornstarch, lemon juice, and vanilla extract. Cook over medium heat until the mixture bubbles and transforms into a fragrant filling.
Step 3: Cool the Filling
Remove the pot from the heat and let the filling cool. This step is crucial, as a hot filling can cause the crust to become soggy when assembled.
Step 4: Roll Out the Pie Crust
Roll out your pie crust on a floured surface until it’s about 12 inches in diameter. Carefully place it in a pie dish, ensuring there are no cracks.
Step 5: Add the Cherry Filling
Pour the cooled cherry filling into the crust, making sure it’s evenly distributed. Dot the top with small pieces of butter—this adds richness and flavor.
Step 6: Cover and Seal the Pie
Cover the cherry filling with a second crust, sealing the edges well. Cut slits in the top crust, allowing steam to escape. This helps the filling bubble beautifully without ruining your crust.
Step 7: Apply the Egg Wash
Brush the top of the pie with a beaten egg. This gives your cherry pie a lovely golden color and an appetizing shine once baked.
Step 8: Bake to Perfection
Bake your pie for 30-35 minutes until the crust is golden brown and the filling is bubbling away, delighting your senses.
Step 9: Cool Before Serving
Allow the pie to cool for at least 15 minutes before slicing. This waiting period ensures the filling sets nicely and makes for easier portions.
Serving Suggestions & Pairings
Serve your cherry pie warm or at room temperature, topped with a scoop of vanilla ice cream or a dollop of freshly whipped cream. For an extra touch, sprinkle some toasted almonds on top for added crunch and design! Pair it with a hot cup of coffee or a refreshing glass of lemonade for delightful contrast.
Storage & Leftovers Guide
To store leftover pie, cover it with plastic wrap or foil and keep it in the fridge for up to 3 days. If you’d like to extend its life, you can freeze slices wrapped in plastic and aluminum foil for up to 2 months. Just remember to thaw it overnight in the fridge when you’re ready to enjoy it again.
Kitchen Wisdom & Success Tips
- If using frozen cherries, there’s no need to thaw them beforehand—just increase the cooking time slightly.
- Always taste your filling before pouring it into the crust. Adjust sugar to your liking—some cherries can be sweeter or tarter than others.
- For an extra touch of flavor, consider adding a pinch of almond extract to the filling.
Flavor Variations & Adaptations
Looking for a twist? Why not incorporate a touch of cinnamon or nutmeg into the cherry filling for a warm, spiced flavor? You can also mix berries—try raspberries or blueberries alongside the cherries for a berry explosion! Consider a crumble topping for a different texture or use a puff pastry crust for an airy, flaky aesthetic.
Reader Questions & Solutions
-
Can I substitute cornstarch with flour?
Yes, you can use all-purpose flour instead of cornstarch. However, you’ll need about double the amount of flour to achieve the same thickening effect. -
Why is my pie crust soggy?
A soggy crust can result from a hot filling. Let your filling cool before assembling, and consider pre-baking your crust for a few minutes to firm it up before adding the filling. -
How do I know when the pie is done?
Look for a golden-brown crust and bubbly filling; this is your sign that the pie is baked perfectly. You should also see juices bubbling through the slits in the top crust. -
Is it necessary to cut slits in the top crust?
Yes! Cutting slits allows steam to escape, which prevents the pie from becoming soggy and helps ensure an even bake. -
How can I get a flaky pie crust?
Make sure your butter is cold and distribute the fat into the flour without overworking it, which helps keep the texture light and flaky.
Wrapping Up
Creating a cherry pie is not just about mixing ingredients; it’s about infusing love and warm memories into every slice. As you take those first bites, let the sweet-sour symphony of cherries envelop you in happiness. I hope you find joy in making, sharing, and enjoying this classic dessert as much as I have throughout my life. Happy baking!
PrintFresh Cherry Pie
A classic cherry pie bursting with sweet-tart flavor and nostalgic memories.
- Prep Time: 15 minutes
- Cook Time: 30 minutes
- Total Time: 45 minutes
- Yield: 8 servings 1x
- Category: Dessert
- Method: Baking
- Cuisine: American
- Diet: Vegetarian
Ingredients
- 2 cups fresh or frozen cherries
- 1 cup sugar
- 2 tablespoons cornstarch
- 1 tablespoon lemon juice
- 1 teaspoon vanilla extract
- 1 tablespoon butter
- 1 pie crust (store-bought or homemade)
- 1 egg (for egg wash)
Instructions
- Preheat your oven to 425°F (220°C).
- Combine the cherries, sugar, cornstarch, lemon juice, and vanilla extract in a pot. Cook over medium heat until bubbling.
- Remove the pot from heat and let the filling cool.
- Roll out your pie crust on a floured surface until about 12 inches in diameter.
- Pour the cooled cherry filling into the crust.
- Cover the filling with a second crust, sealing the edges. Cut slits for steam to escape.
- Brush the top with beaten egg.
- Bake for 30-35 minutes until golden brown.
- Allow to cool for at least 15 minutes before slicing.
Notes
Serve warm with vanilla ice cream or whipped cream for an added treat.
Nutrition
- Serving Size: 1 slice
- Calories: 250
- Sugar: 20g
- Sodium: 150mg
- Fat: 10g
- Saturated Fat: 5g
- Unsaturated Fat: 5g
- Trans Fat: 0g
- Carbohydrates: 40g
- Fiber: 2g
- Protein: 2g
- Cholesterol: 30mg


