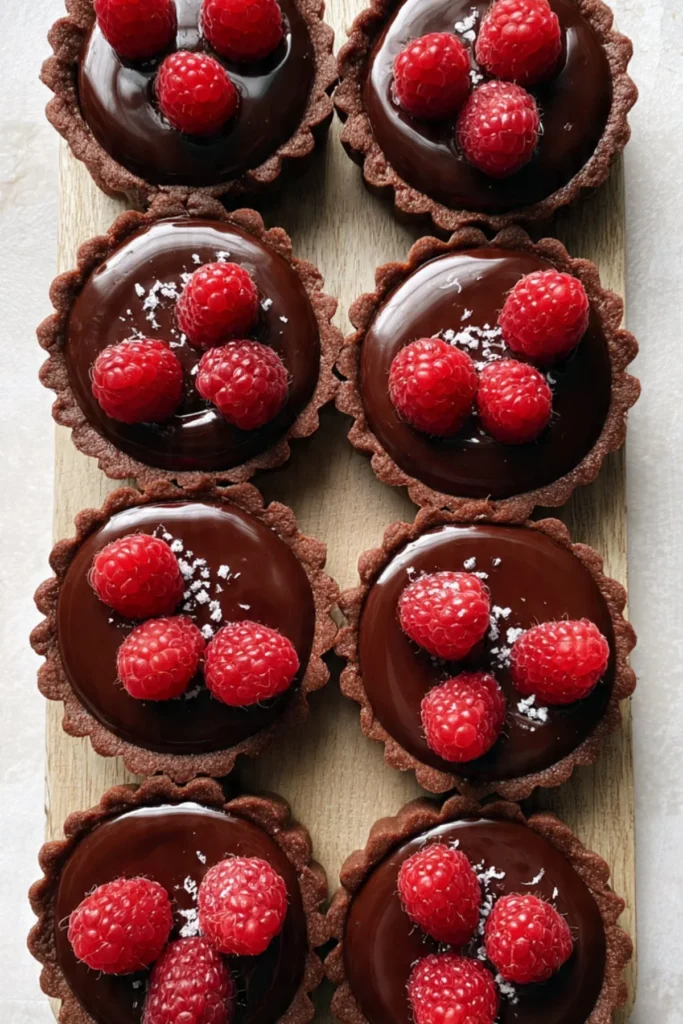
The moment I took a bite of a chocolate raspberry tartlet for the first time, it was like a symphony of flavors dancing on my palate. The rich, velvety chocolate melded perfectly with the tart freshness of ripe raspberries, creating a delectable contrast that felt indulgent yet fresh. As I savored that first bite, I knew these tartlets were destined to become a staple in my dessert repertoire—simple enough for a weeknight treat yet elegant enough to impress guests at a dinner party.
In my journey as a home cook, I’ve always cherished desserts that are easy to make but deliver a high impact. These Chocolate Raspberry Tartlets serve as the perfect example, combining straightforward techniques with a balance of tastes that leave a lasting impression. Let’s dive into the details and create this delightful dessert together!
Recipe Timing
- Prep Duration: 20 minutes
- Active Cooking: 25 minutes
- Total Duration: 1 hour 45 minutes (including chilling time)
- Portion Size: Serves 6
- Complexity: Simple
Nutritional Recipe
- Calories per portion: Approx. 250
- Protein: 2g
- Carbs: 23g
- Fats: 17g
- Fiber: 1g
- Sugars: 7g
- Sodium: 50mg
Why You’ll Love This Chocolate Raspberry Tartlets
What’s not to love? The rich, smooth chocolate filling pairs exquisitely with the juicy pop of fresh raspberries, creating a delectable dessert that sings of summer. Plus, they’re visually stunning. Arranged on a plate with a sprinkle of powdered sugar or a garnish of mint, these tartlets are the show-stoppers of any dessert table. With minimal effort, you can treat yourself and your loved ones to an unforgettable experience!
The Complete Cooking Journey
Together, we will go step-by-step through this recipe, transforming humble ingredients into beautiful tartlets that are sure to wow. So put your aprons on and let’s get started!
Ingredients:
- 1 cup all-purpose flour
- 1/4 cup powdered sugar
- 1/2 cup unsalted butter, cold and cubed
- 1 egg yolk
- 1/2 cup semisweet chocolate chips
- 1/2 cup heavy cream
- 1 cup fresh raspberries
- Mint leaves for garnish (optional)
Method:
Step 1: Preheat Your Oven
Preheat the oven to 350°F (175°C). This gives your oven the time it needs to reach temperature while you prepare the tartlet dough.
Step 2: Mix Dry Ingredients
In a bowl, mix the flour and powdered sugar together. This combination will give your tart crust a delightful sweetness and a smooth texture.
Step 3: Incorporate Butter
Add the cold, cubed butter into the dry ingredients. Using your fingers or a pastry cutter, mix until the texture becomes crumbly—think small, pea-sized particles.
Step 4: Form the Dough
Stir in the egg yolk and bring the mixture together to form a ball of dough. It might seem crumbly at first, but with a little kneading, it will come together beautifully.
Step 5: Roll Out the Dough
On a lightly floured surface, roll out the dough until it’s about 1/8-inch thick. Then, gently press it into your tartlet pans, making sure to cover the bottom and sides evenly.
Step 6: Bake the Shells
Place the tartlet pans in the preheated oven and bake for 15-20 minutes, or until the crusts turn golden brown. Once done, let them cool on a wire rack.
Step 7: Make the Chocolate Ganache
In a saucepan, heat the heavy cream until it’s just about to boil. Remove from heat and add in the semisweet chocolate chips. Stir until melted and smooth, creating that luscious ganache.
Step 8: Fill the Tartlet Shells
Pour the rich chocolate ganache into the cooled tartlet shells, filling them generously.
Step 9: Top with Raspberries
Scatter fresh raspberries atop the chocolate filling, allowing their vibrant color to shine and provide a burst of flavor.
Step 10: Chill Before Serving
Refrigerate the tartlets for at least 1 hour before serving. This chilling time allows the ganache to set perfectly.
Step 11: Garnish and Serve
If desired, garnish with fresh mint leaves and a dusting of powdered sugar for that extra touch.
Serving Suggestions & Pairings
These tartlets are best enjoyed chilled, making them an ideal dessert for summer gatherings or picnics. Pair them with a dollop of whipped cream or a scoop of vanilla ice cream for added indulgence. A glass of chilled rosé or a cup of freshly brewed coffee complements these tartlets beautifully.
Storage & Leftovers Guide
These tartlets can be stored in the refrigerator for up to 3 days, but they are best enjoyed fresh. If you have leftovers, cover them wisely with plastic wrap to maintain their crispness.
Kitchen Wisdom & Success Tips
- Use chilled hands when handling the dough; warmth can make it sticky.
- Don’t skip the chilling time! It enhances flavors and allows the ganache to set properly.
- You can use frozen raspberries if fresh are unavailable; just thaw them before topping your tartlets.
Flavor Variations & Adaptations
Feel free to get creative! Substitute the raspberries with strawberries or blueberries for a different twist. For a sophisticated flavor, add a pinch of sea salt to the chocolate ganache or infuse the cream with a splash of your favorite liqueur.
Reader Questions & Solutions
-
What if my dough is too crumbly?
- Add a couple of teaspoons of cold water to help it come together.
-
Can I use dark chocolate instead of semisweet?
- Absolutely! Dark chocolate will give an intense flavor that’s simply divine.
-
How do I know when the tartlet shells are done?
- They are ready when they turn a golden brown and smell heavenly!
-
Is it necessary to refrigerate the tartlets before serving?
- Yes, chilling helps the ganache firm up and makes them easier to slice.
-
Can I make the tartlet shells ahead of time?
- Certainly! You can prepare the shells a day in advance and fill them just before serving.
Wrapping Up
I hope you’re inspired to whip up these Chocolate Raspberry Tartlets in your kitchen. They embody the joy of putting love into food, and I promise you’ll relish every bite. Whether it’s a cozy dinner at home, a celebration with friends, or simply a treat for yourself, these tartlets are a sweet reminder that life is meant to be savored—one delicious bite at a time. Happy baking!
PrintChocolate Raspberry Tartlets

Indulge in these easy-to-make Chocolate Raspberry Tartlets that combine a rich chocolate filling with fresh raspberries for a delicious dessert.
- Prep Time: 20 minutes
- Cook Time: 25 minutes
- Total Time: 105 minutes
- Yield: 6 servings 1x
- Category: Dessert
- Method: Baking
- Cuisine: French
- Diet: Vegetarian
Ingredients
- 1 cup all-purpose flour
- 1/4 cup powdered sugar
- 1/2 cup unsalted butter, cold and cubed
- 1 egg yolk
- 1/2 cup semisweet chocolate chips
- 1/2 cup heavy cream
- 1 cup fresh raspberries
- Mint leaves for garnish (optional)
Instructions
- Preheat the oven to 350°F (175°C).
- In a bowl, mix the flour and powdered sugar together.
- Add the cold, cubed butter into the dry ingredients and mix until crumbly.
- Stir in the egg yolk and form a ball of dough.
- Roll out the dough until 1/8-inch thick and press it into tartlet pans.
- Bake for 15-20 minutes or until golden brown, then cool on a wire rack.
- Heat the heavy cream until just boiling, then stir in the chocolate chips until melted.
- Pour the ganache into cooled tartlet shells.
- Top with fresh raspberries.
- Chill in the refrigerator for at least 1 hour before serving.
- Garnish with mint leaves and powdered sugar before serving.
Notes
Best enjoyed chilled; can be made a day in advance. Substitute raspberries with strawberries or blueberries if desired.
Nutrition
- Serving Size: 1 tartlet
- Calories: 250
- Sugar: 7g
- Sodium: 50mg
- Fat: 17g
- Saturated Fat: 10g
- Unsaturated Fat: 7g
- Trans Fat: 0g
- Carbohydrates: 23g
- Fiber: 1g
- Protein: 2g
- Cholesterol: 30mg