As the sun begins to set, casting a warm glow over my kitchen, I’m reminded of the comforting aroma that fills the air when I bake my favorite desserts. There’s something magical about the alchemy of ingredients coming together, and for me, one of the ultimate treats has always been cheesecake. But often, cheesecake is synonymous with indulgence, and that can carry a heavy toll on our waistlines and well-being. That’s why I’m thrilled to share this delightful High Protein Cheesecake recipe that is not only delicious but also packs a powerful protein punch of 25 grams per slice! Let’s dive into this creamy delight that allows you to enjoy dessert while staying guilt-free.
Recipe Timing
- Prep Duration: 15 minutes
- Active Cooking: 45 minutes
- Total Duration: 1 hour
- Portion Size: 8 slices
- Complexity: Simple
Nutritional Recipe
- Calories per portion: 190
- Protein: 25g
- Carbs: 17g
- Fats: 7g
- Fiber: 2g
- Sugars: 3g
- Sodium: 150mg
Why You’ll Love This High Protein Cheesecake Recipe (with 25g protein a slice!) | Cheesecake recipes low calorie, Healthy cheesecake recipes, High protein desserts
This cheesecake is your go-to dessert for guilt-free indulgence that feels decadent without the added calories. Ideal for anyone looking to boost their protein intake—whether you’re an athlete, a busy professional, or simply someone who loves to indulge without the guilt—this High Protein Cheesecake fits the bill. Every bite is creamy, luscious, and infused with flavor, ensuring you won’t miss the calories. Plus, it’s incredibly easy to whip up, making it a perfect weeknight treat or a showstopper for gatherings.
The Complete Cooking Journey
The journey from humble ingredients to a rich, wholesome cheesecake is satisfying and simple. Each step unfolds in your kitchen, filling the room with aromas that invite everyone in. Whether you have a penchant for creaminess or a craving for something sweet, this cheesecake is bound to win hearts and taste buds alike.
Ingredients:
- 2 cups low-fat Greek yogurt
- 1 cup cottage cheese
- 3 eggs
- 1/2 cup sweetener of choice (like erythritol or stevia)
- 1 tsp vanilla extract
- 1 tbsp lemon juice
- 2 tbsp cornstarch
- A pinch of salt
- Optional: Fresh berries or a low-calorie fruit topping
Method:
Step 1: Preheat the Oven
Start by preheating your oven to 325°F (160°C). This ensures that your cheesecake will bake evenly and come out perfectly fluffy.
Step 2: Prepare Your Baking Dish
Line a round 9-inch baking pan with parchment paper to prevent sticking. This small step will save you time and hassle when it’s time to serve.
Step 3: Blend the Base
In a blender or food processor, combine the Greek yogurt, cottage cheese, eggs, sweetener, vanilla extract, lemon juice, cornstarch, and salt. Blend on high until the mixture is completely smooth and creamy, which should only take a minute or two.
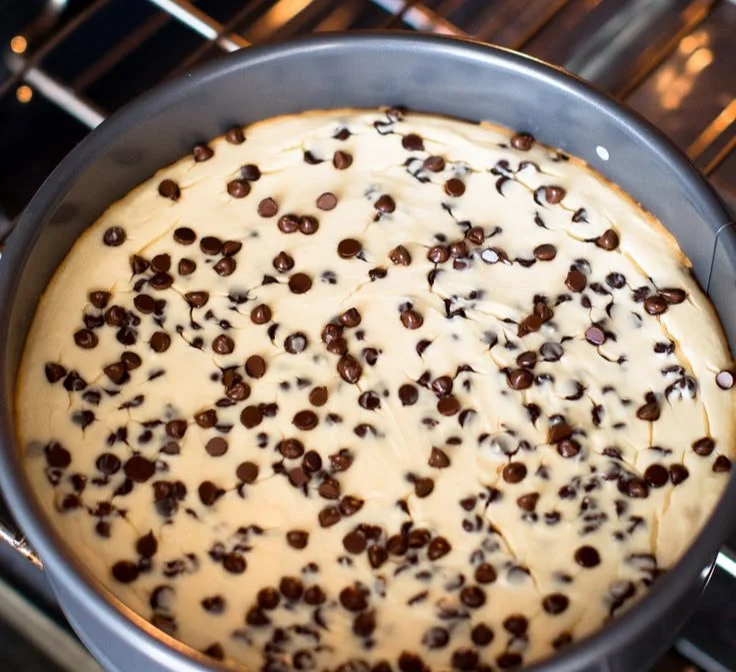
Step 4: Pour and Smooth
Transfer the cheesecake mixture into the prepared baking pan. Use a spatula to smooth the top for an even surface.
Step 5: Water Bath Preparation
To help maintain moisture and prevent cracks during baking, place the cheesecake in a larger pan filled with hot water to create a water bath.
Step 6: Bake to Perfection
Bake in the preheated oven for about 40-45 minutes, until the edges are set and the center slightly jiggles when you gently shake the pan.
Step 7: Cool Gradually
Once baked, turn off the oven and crack the door open, letting the cheesecake cool inside for an hour. This gradual cooling helps prevent the infamous cheesecake cracks.
Step 8: Chill in the Fridge
After cooling in the oven, transfer your cheesecake to the refrigerator. Let it chill for at least 4 hours (or overnight) before slicing. Patience will reward you with perfect slices!
Step 9: Garnish and Serve
When ready to serve, top with fresh berries or a delicious fruit topping. Slice and enjoy your healthy, protein-packed indulgence!
Serving Suggestions & Pairings
This cheesecake pairs beautifully with a cup of herbal tea or a dollop of low-calorie whipped cream on the side. For a more extravagant dessert experience, serve with a fruit coulis or a sprinkle of nuts on top for a delightful crunch.
Storage & Leftovers Guide
Store any leftovers in an airtight container in the fridge, where they will keep well for up to 5 days—and trust me, it’s just as tasty, if not more so, the next day! You can also freeze individual slices for up to a month. Just thaw them in the fridge overnight before serving.
Kitchen Wisdom & Success Tips
- Make sure all your ingredients are at room temperature for a smoother texture.
- Don’t skip the water bath; it really does make a difference in preventing cracks.
- Experiment with different flavorings like almond extract or cocoa powder for a chocolate variation!
Flavor Variations & Adaptations
Feel free to get creative! This cheesecake serves as a blank canvas; add lemon zest for a refreshing twist, swap out Greek yogurt for a dairy-free alternative, or add a swirl of natural peanut butter for a nutty flavor!
Reader Questions & Solutions
- Can I use low-fat cream cheese instead of cottage cheese? Yes, but be mindful that this will change the protein content and increase the calories.
- What can I use as a sweetener? Opt for erythritol, stevia, or any sweetener of your choice, but adjust according to your taste preferences.
- How do I know when my cheesecake is done? It should be set around the edges but slightly jiggly in the center.
- Can this recipe be made sugar-free? Absolutely! Use a sugar substitute that measures cup-for-cup like erythritol or stevia.
- What if I don’t have cornstarch? You can replace cornstarch with an equal amount of arrowroot powder or simply omit it for a softer texture.
Wrapping Up
This High Protein Cheesecake is not just a dessert; it’s a celebration of healthy eating and happy moments shared around the table. It redefines what it means to indulge, transforming a classic treat into a nourishing delight. So roll up your sleeves, gather those ingredients, and create a cheesecake that will not only satisfy your sweet tooth but also nurture your body. Happy baking!
PrintHigh Protein Cheesecake

A deliciously creamy cheesecake packed with 25 grams of protein per slice, making it a guilt-free indulgence.
- Prep Time: 15 minutes
- Cook Time: 45 minutes
- Total Time: 60 minutes
- Yield: 8 slices 1x
- Category: Dessert
- Method: Baking
- Cuisine: American
- Diet: High Protein, Low Calorie
Ingredients
- 2 cups low-fat Greek yogurt
- 1 cup cottage cheese
- 3 eggs
- 1/2 cup sweetener of choice (like erythritol or stevia)
- 1 tsp vanilla extract
- 1 tbsp lemon juice
- 2 tbsp cornstarch
- A pinch of salt
- Optional: Fresh berries or a low-calorie fruit topping
Instructions
- Preheat the oven to 325°F (160°C).
- Line a round 9-inch baking pan with parchment paper.
- Blend the Greek yogurt, cottage cheese, eggs, sweetener, vanilla extract, lemon juice, cornstarch, and salt until smooth.
- Transfer the cheesecake mixture into the prepared baking pan and smooth the top.
- Place the cheesecake in a larger pan filled with hot water for a water bath.
- Bake for 40-45 minutes until the edges are set and the center jiggles.
- Turn off the oven and crack the door to let the cheesecake cool inside for an hour.
- Refrigerate for at least 4 hours before slicing.
- Top with fresh berries or fruit topping before serving.
Notes
For best results, ensure all ingredients are at room temperature. Use a water bath to prevent cracks. Can be made sugar-free.
Nutrition
- Serving Size: 1 slice
- Calories: 190
- Sugar: 3g
- Sodium: 150mg
- Fat: 7g
- Saturated Fat: 2g
- Unsaturated Fat: 5g
- Trans Fat: 0g
- Carbohydrates: 17g
- Fiber: 2g
- Protein: 25g
- Cholesterol: 150mg