
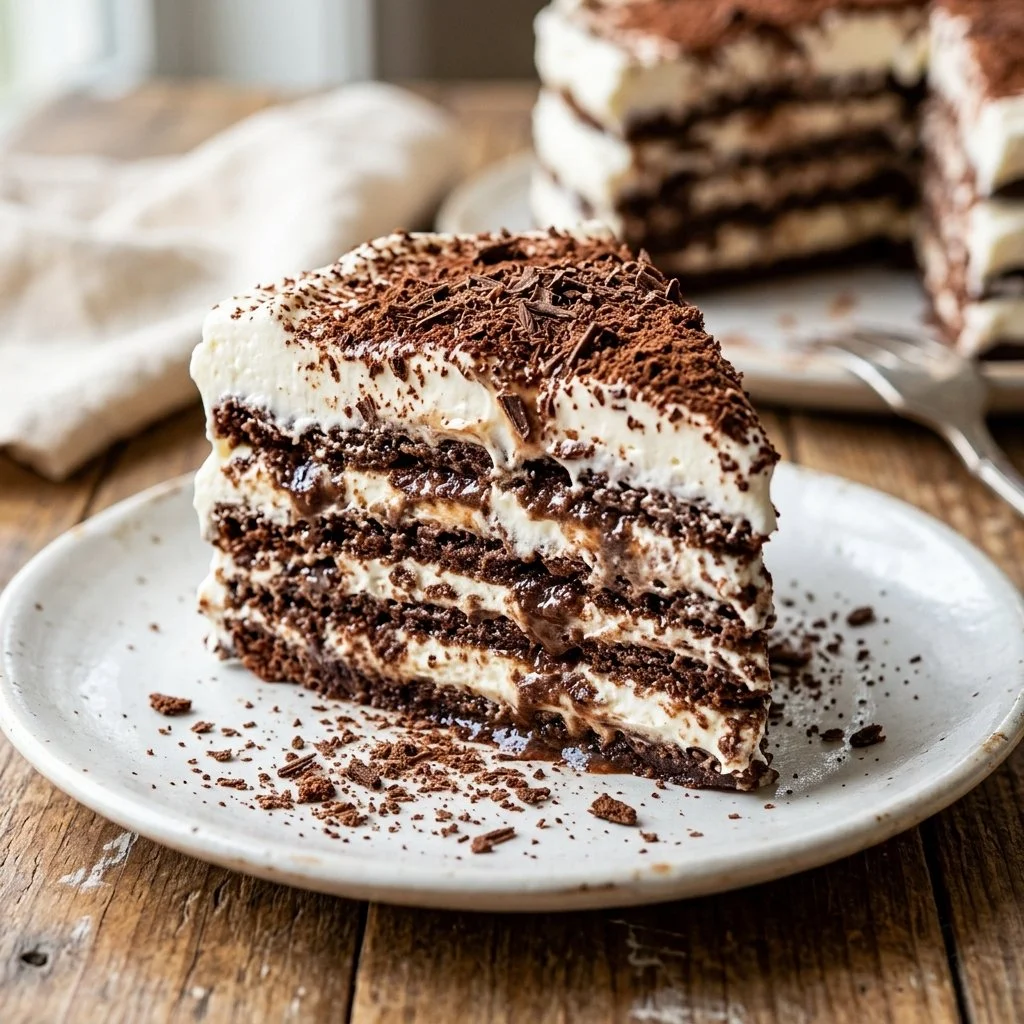
There’s something wonderfully nostalgic about making an icebox cake. I can still hear my grandmother’s laughter in the kitchen as she declared, “Dessert is all about patience!” She had this uncanny ability to create layered delights that tasted like love, patience, and a sprinkle of magic. One of her favorites was the ever-simple icebox cake—a sweet treat that perfectly balances rich creamy layers with a pleasant crunch of graham crackers. As I whip up this treat now in my own kitchen, I’m transported back to those warm afternoons where patience and sweetness danced hand in hand.
Recipe Timing
- Prep Duration: 15 minutes
- Active Cooking: 15 minutes
- Total Duration: 4 hours (plus chilling time)
- Portion Size: Serves 8
- Complexity: Simple
Nutritional Recipe
- Calories per portion: Approximately 250
- Protein: 3g per serving
- Carbs: 35g per serving
- Fats: 11g per serving
- Fiber: 1g per serving
- Sugars: 18g per serving
- Sodium: 150mg per serving
Why You’ll Love This Icebox Cake
This icebox cake is the epitome of effortless dessert-making! It will wow your friends and family without requiring hours of slaving away in the kitchen. The layered combination of creamy pudding, fluffy whipped cream, and crunchy graham crackers becomes a symphony of textures in every bite. Plus, the best part? You can customize it to your heart’s content with toppings and layers that speak to your tastes. Whether you wish to go the classic route with chocolate shavings or elevate it with fresh fruits like strawberries or raspberries, this cake is a true crowd-pleaser.
The Complete Cooking Journey
Making an icebox cake is like assembling a lovely puzzle made of delicious pieces. Gather your ingredients, and let the layering fun begin! As you prepare the pudding and construct the layers, the anticipation builds, knowing the sweet result that awaits in the fridge. The cooling process is the perfect time to unwind while your cake takes shape. Then, when it’s finally time to slice into this chilled delight, you can bask in the joy of your creation.
Ingredients:
- Graham crackers
- Pudding mix
- Milk
- Whipped cream
- Chocolate shavings or fruit (for layering)
Method:
Step 1: Prepare the Pudding Mixture
In a bowl, prepare the pudding mix with milk according to package instructions. This step ensures each layer is creamy and packed with flavor.
Step 2: Layer the Graham Crackers
In a rectangular dish, begin layering your graham crackers. This will form the delightful crunchy bed for your pudding and whipped cream layers.
Step 3: Add the First Layer of Pudding
Spread a layer of the prepared pudding over the graham crackers, allowing the creamy mixture to seep into all the nooks and crannies.
Step 4: Spread the Whipped Cream
Next, generously dollop a layer of whipped cream over the pudding, bringing a light and airy texture to balance the richness.
Step 5: Repeat the Layers
Repeat the layers until all ingredients are used, making sure to finish with a luscious layer of whipped cream on top, creating a beautiful snowy peak.
Step 6: Chill in the Refrigerator
Chill in the refrigerator for at least 4 hours or overnight. Patience is key here; it allows the flavors to meld and the layers to set beautifully.
Step 7: Garnish Before Serving
Before serving, sprinkle chocolate shavings or luscious fresh fruit on top for that final touch of elegance and increased deliciousness.
Serving Suggestions & Pairings
Icebox cake pairs beautifully with a cup of freshly brewed coffee or a creamy vanilla latte. Consider serving it alongside a fresh berry salad to enhance the fruity notes. For special occasions, a glass of bubbly can elevate your dessert experience and bring an air of celebration.
Storage & Leftovers Guide
Leftover icebox cake can be stored in the refrigerator for up to 3 days. Just be sure it’s covered to keep the desserts from absorbing any unwanted odors. Beyond that, the wonderful textures and flavors may start to change.
Kitchen Wisdom & Success Tips
- When layering, don’t worry about perfection. The beauty of an icebox cake lies in its homemade charm.
- Use whole milk for a richer pudding; skim milk works just fine if you’re looking for something lighter.
- If you’re short on time, you can use store-bought whipped cream, but homemade is always a treat.
Flavor Variations & Adaptations
Try using different flavors of pudding mixes like vanilla, banana, or even butterscotch for a new twist. Add layers of chopped nuts for crunch, or change up the fruits based on the season for a fresh idea. Caramel sauce drizzled on top can also bring an extra layer of flavor.
Reader Questions & Solutions
1. Can I use dairy-free alternatives?
Absolutely! Substitute the milk and whipped cream with almond milk and coconut whipped cream for a delightful dairy-free version.
2. What if I don’t have time to chill it overnight?
While chilling for 4 hours is ideal, you can chill it for a minimum of 2 hours in a pinch, but the texture may be less firm.
3. How can I make mini icebox cakes?
Layer the ingredients in small mason jars instead of a big dish, which makes for delightful individual servings and easy transport!
4. Can I freeze icebox cake?
While it’s best enjoyed fresh, it can be frozen for up to a month. Just ensure it’s well-wrapped to prevent freezer burn.
5. What should I do if the pudding doesn’t thicken?
If your pudding doesn’t seem the right consistency, let it sit for a few minutes—the cooling process can sometimes help it firm up further.
Wrapping Up
There’s a certain magic in creating a dessert that melds warmth and nostalgia, especially one as simple and delicious as an icebox cake. As you gather your ingredients and build those beautiful layers, remember the joy of cooking comes not just from the process but from sharing it with loved ones. Get ready to slice into this creamy delight and give yourself a well-deserved treat. Enjoy every bite and don’t forget to make some wonderful memories along the way!
PrintIcebox Cake
A nostalgic dessert combining creamy layers with crunchy graham crackers, perfect for any occasion.
- Prep Time: 15 minutes
- Cook Time: 15 minutes
- Total Time: 240 minutes
- Yield: 8 servings
- Category: Dessert
- Method: Chilling
- Cuisine: American
- Diet: Vegetarian
Ingredients
- Graham crackers
- Pudding mix
- Milk
- Whipped cream
- Chocolate shavings or fruit (for layering)
Instructions
- Prepare the pudding mix with milk according to package instructions.
- Layer your graham crackers in a rectangular dish.
- Spread a layer of the prepared pudding over the graham crackers.
- Spread a layer of whipped cream over the pudding.
- Repeat the layers until all ingredients are used, finishing with whipped cream on top.
- Chill in the refrigerator for at least 240 minutes.
- Garnish with chocolate shavings or fruits before serving.
Notes
Leftovers can be stored in the refrigerator for up to 3 days. For variations, consider different pudding flavors or adding chopped nuts.
Nutrition
- Serving Size: 1 serving
- Calories: 250
- Sugar: 18g
- Sodium: 150mg
- Fat: 11g
- Saturated Fat: 7g
- Unsaturated Fat: 2g
- Trans Fat: 0g
- Carbohydrates: 35g
- Fiber: 1g
- Protein: 3g
- Cholesterol: 0mg


