
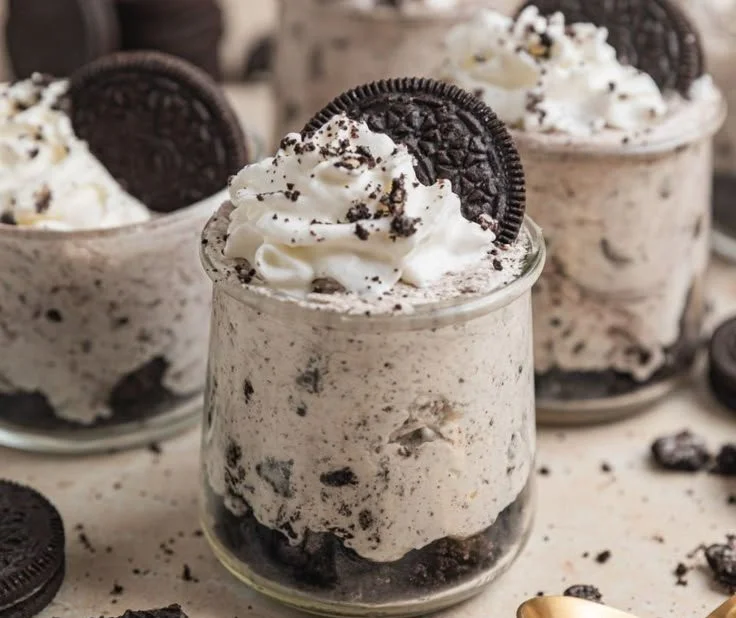
There’s something so magical about a dessert that requires no baking. Isn’t it lovely to enjoy a little indulgence without having to slave away in the kitchen for hours? The other day, as I was reminiscing about my childhood, I couldn’t help but think of those delightful Oreo cookies that used to bring me so much joy. They were more than just a treat; they were an experience—dunking them in milk, the crunch and creaminess mingling on my palate. This inspired me to create something simple yet scrumptious: Oreo No-Bake Cheesecake Cups. These cups embody all the nostalgia and flavor of those cookies, but with a creamy twist that’ll have you swooning.
Recipe Timing
- Prep Duration: 15 minutes
- Active Cooking: 10 minutes
- Total Duration: 1 hour 15 minutes (including chilling)
- Portion Size: Serves 6
- Complexity: Simple
Nutritional Recipe
- Calories per portion: Approximately 300
- Protein: 4 grams per serving
- Carbs: 36 grams per serving
- Fats: 16 grams per serving
- Fiber: 1 gram per serving
- Sugars: 20 grams per serving
- Sodium: 270 mg per serving
Why You’ll Love This Oreo No-Bake Cheesecake Cups
These Oreo No-Bake Cheesecake Cups are an easy way to impress your guests while satisfying your sweet tooth. Perfect for summer gatherings, dinner parties, or even movie nights, these delightful cups are an instant crowd-pleaser. The combination of the rich, creamy cheesecake filling and the crunchy, chocolatey Oreo crust creates a delightful textural contrast that makes each spoonful absolutely irresistible. Plus, they can be prepared ahead of time, leaving you free to enjoy the company of your friends and family.
The Complete Cooking Journey
Let’s embark on this simple culinary adventure together! You’ll be amazed at how quickly you can whip these up. The satisfaction of crushing those Oreos, beating the cream cheese to a velvety texture, and finally, the joy of tasting the finished product—it’s pure bliss!
Ingredients:
- 1 8 oz block of cream cheese, softened
- 1 8 oz Cool Whip or whipped topping
- 2/3 cup powdered sugar
- 1 tsp vanilla
- 24-26 Oreo cookies (more as desired)
Method:
Step 1: Crush the Oreos
Place the Oreos in a plastic bag and seal. Using a rolling pin or a sturdy wooden spoon, crush the Oreos until you have a mix of fine crumbs and bigger chunks. This will create a scrumptious base for our cheesecake cups!
Step 2: Spoon the Base
Spoon 1 1/2 to 2 tablespoons of the crushed Oreos into the bottom of 6 small dessert dishes. Make sure your dishes hold at least 3/4 cup to 1 cup in size. Set these aside while we prepare the creamy filling.
Step 3: Beat the Cream Cheese
Using a hand or standing mixer, whip the softened cream cheese and powdered sugar together until creamy and smooth. This is the foundation of your cheesecake, so ensure it’s well combined!
Step 4: Add the Vanilla
Add the vanilla to the mixture and beat again until it’s fully incorporated. The vanilla adds that comforting warmth we all love in desserts.
Step 5: Fold in the Cool Whip
Gently fold in the Cool Whip to the cream cheese mixture. You want it to be fluffy and light—this is what gives our cheesecake its lovely texture!
Step 6: Incorporate the Remaining Oreos
Now, fold in the remaining crushed Oreos. This will give each bite those delightful chunks of Oreo goodness.
Step 7: Fill the Dessert Dishes
Divide the cheesecake filling evenly across the dishes, using a spatula to gently press it onto the crushed Oreos beneath.
Step 8: Chill
Cover the cups with plastic wrap and chill in the refrigerator for about 1 hour, or until you’re ready to serve. The cooling allows the flavors to meld together beautifully!
Step 9: Garnish and Enjoy
Before serving, top each cheesecake cup with a dollop of whipped cream and sprinkle with more crushed Oreos for that extra garnish. Take that first bite, and enjoy the bliss of a well-deserved dessert!
Serving Suggestions & Pairings
These cheesecake cups are delightful on their own, but why not add a few fresh berries on top for a pop of color? A drizzle of chocolate sauce or even a scoop of vanilla ice cream on the side can elevate the dessert further. They’re perfect paired with a tall glass of cold milk or a steaming mug of coffee.
Storage & Leftovers Guide
These cheesecake cups can be stored in the fridge for up to 3 days, making them ideal for meal prep or sweet leftovers. Just be sure to cover them tightly to keep them fresh!
Kitchen Wisdom & Success Tips
- Cream Cheese: Make sure your cream cheese is softened for easier mixing. Leaving it out at room temperature for about an hour before use works wonders!
- Cool Whip: If you prefer homemade whipped cream, just whip heavy cream with a bit of sugar until soft peaks form; this can be a lovely fresh alternative.
- Leftover Oreos: If you have extra Oreos, they make a great snack on the side, or you can use them as a crunchy topping on other desserts!
Flavor Variations & Adaptations
Love a little twist? Try adding peanut butter to the cheesecake filling for a delicious variation. You can also substitute different cookies like golden Oreos or even chocolate chip cookies to cater to your taste buds!
Reader Questions & Solutions
-
What can I use instead of Cool Whip? You can make your own whipped cream using heavy whipping cream and sugar.
-
Can I freeze these cups? Yes! They can be kept in the freezer for up to a month. Let them thaw in the fridge for a few hours before serving.
-
How can I make this recipe lower in sugar? Substitute the powdered sugar for a sugar alternative that has a 1:1 ratio.
-
Can I use a different kind of crust? Absolutely! You could use graham crackers or even make a crust using nuts for a gluten-free option.
-
Why did my cream cheese mixture turn out lumpy? This can happen if the cream cheese isn’t softened completely. Make sure to mix until smooth.
Wrapping Up
These Oreo No-Bake Cheesecake Cups are a delightful way to satisfy any sweet tooth without turning on the oven. They’re perfect for gatherings, or just a weekday treat after a long day. So go ahead, immerse yourself in this rich, creamy dessert, and remember to share the joy with those you love. Happy cooking!
PrintOreo No-Bake Cheesecake Cups
Delightful Oreo No-Bake Cheesecake Cups embody the nostalgia of classic Oreo cookies with a creamy twist, perfect for any occasion.
- Prep Time: 15 minutes
- Cook Time: 10 minutes
- Total Time: 75 minutes
- Yield: 6 servings 1x
- Category: Dessert
- Method: No-Bake
- Cuisine: American
- Diet: Vegetarian
Ingredients
- 1 8 oz block of cream cheese, softened
- 1 8 oz Cool Whip or whipped topping
- 2/3 cup powdered sugar
- 1 tsp vanilla
- 24–26 Oreo cookies (more as desired)
Instructions
- Crush the Oreos by placing them in a plastic bag and sealing it. Use a rolling pin or sturdy wooden spoon to crush until mixed into fine crumbs and bigger chunks.
- Spoon 1 1/2 to 2 tablespoons of crushed Oreos into the bottom of 6 small dessert dishes.
- Beat the softened cream cheese and powdered sugar together using a hand or standing mixer until creamy and smooth.
- Add the vanilla to the mixture and beat until fully incorporated.
- Fold in the Cool Whip to achieve a fluffy and light texture.
- Incorporate the remaining crushed Oreos into the mixture for delightful chunks in every bite.
- Fill the dessert dishes evenly with the cheesecake filling, pressing it onto the crushed Oreos.
- Chill the cups in the refrigerator for about 1 hour until ready to serve.
- Garnish each cheesecake cup with whipped cream and more crushed Oreos before serving.
Notes
These cups can be stored in the fridge for up to 3 days. For additional flavor variations, consider adding peanut butter or using different cookies.
Nutrition
- Serving Size: 1 cup
- Calories: 300
- Sugar: 20g
- Sodium: 270mg
- Fat: 16g
- Saturated Fat: 10g
- Unsaturated Fat: 4g
- Trans Fat: 0g
- Carbohydrates: 36g
- Fiber: 1g
- Protein: 4g
- Cholesterol: 30mg


